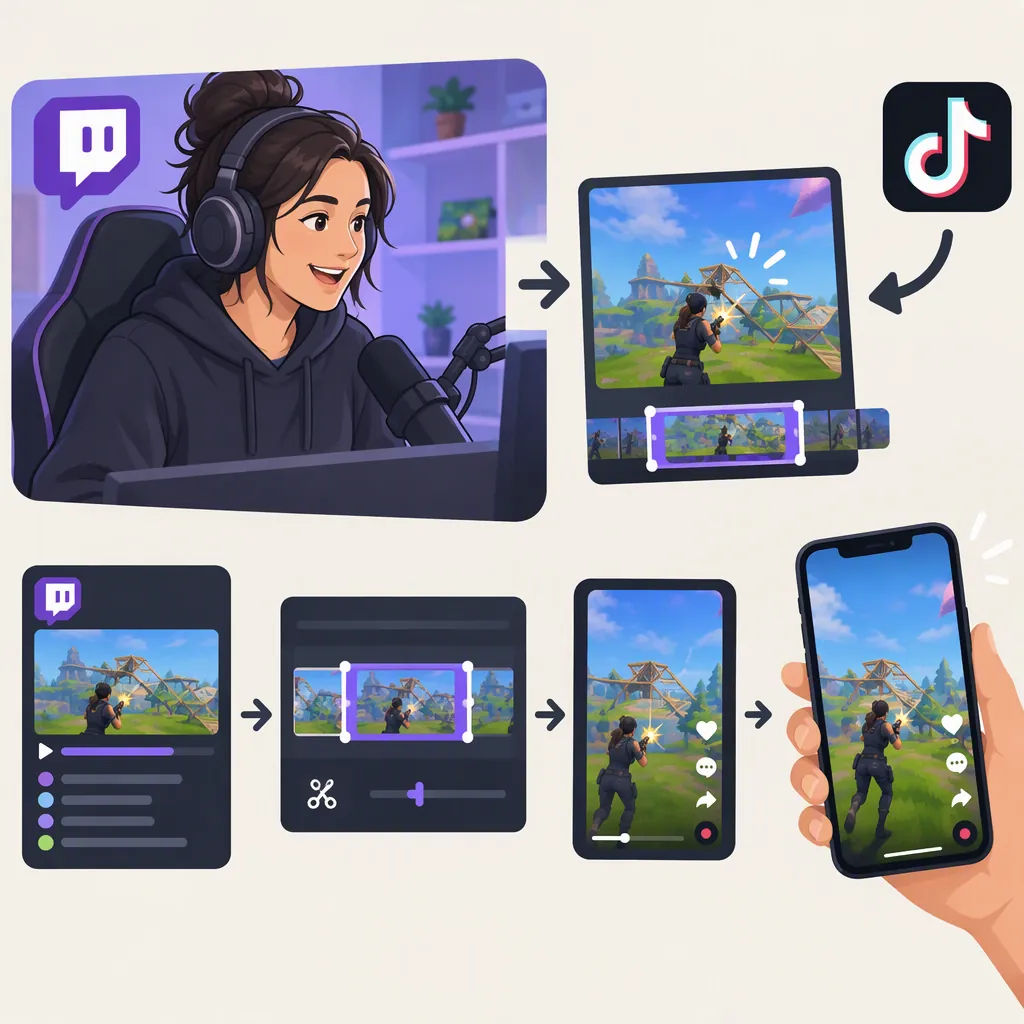
How to Make TikTok Clips from Twitch
To make a TikTok video from a Twitch clip, import a clip link or local video file, trim it to one understandable moment, and reframe the gameplay and any facecam vertically. Add and review captions, keep essential details clear of interface overlays, then render and check the finished video before posting. These core editing steps are covered in StreamLadder’s Twitch-to-TikTok guide. [c1]
The workflow below starts with an available clip or video file. It focuses on editing decisions rather than Twitch’s current clip-creation menus or TikTok’s current upload requirements.
1. Choose and Import a Clip with Enough Context
Begin with footage you own or have permission to reuse. Do not assume that a publicly viewable Twitch clip gives you permission to republish every element in it, including music or another person’s content.
Choose a moment that makes sense without the rest of the stream. Look for a short setup, a clear action or reaction, and a payoff. If viewers need background information, plan a brief explanation rather than keeping a long stretch of unrelated footage.
Next, bring the footage into your editor:
- If the editor supports Twitch clip links: Copy the clip URL and paste it into the editor’s clip-link input.
- If you already have a local video file: Use the editor’s upload or import option and select the file from your device.
Both input methods are described in the cited editing guide, but availability depends on your editor. [c1] If your editor does not accept Twitch links, prepare a video file you have permission to use before continuing; a clip URL alone is not a local video file.
Once the footage loads, preview it to confirm that you have the intended moment and its audio.
Clip Selection Worksheet
- Source clip or file: ______
- Permission or ownership check: ______
- What happens in this moment? ______
- What context does a new viewer need? ______
- Proposed start point: ______
- Proposed end point: ______
- Gameplay, facecam, or interface details that must stay visible: ______
2. Trim Around the Setup and Payoff
Use the editor’s trimming controls to shorten the selected footage. The cited guide includes trimming as part of the editing workflow. [c1]
Set the beginning just before the viewer needs to understand the action. Set the ending after the result or reaction has landed. Treat trimming as a context decision, not simply an effort to make the video as short as possible:
- Remove waiting, repeated explanations, or unrelated conversation where they add no meaning.
- Keep the cue that explains why the moment matters.
- Avoid cutting off the last word of a sentence or the result of an action.
- Watch the shortened version without relying on your memory of the stream.
For example, if a reaction follows an unexpected game event, keep enough of that event to explain the reaction. If the moment still feels confusing, add a concise opening label or choose a different excerpt. Do not present an edited reaction as responding to something that happened elsewhere.
3. Reframe Gameplay and Facecam Vertically
As an editing starting point, use a 9:16 vertical canvas. This is a layout recommendation, not a statement of TikTok’s current upload requirements.
Decide whether the clip works best as one cropped image or as separate gameplay and facecam regions. The cited guide describes layouts with and without a facecam, along with options for preserving the game interface. [c1]
| Layout approach | When to consider it | What to check |
|---|---|---|
| Single gameplay crop | The action explains the moment without a facecam | The crop keeps the target, result, and relevant interface visible |
| Gameplay and facecam in separate regions | Both the action and the streamer’s reaction matter | Neither region is too small to understand |
| Layout that preserves interface details | A menu, inventory, score, or other interface element explains the moment | The necessary detail remains readable |
For a single-image crop, reposition the source footage within the vertical canvas so the important action stays visible. For a split layout, select the gameplay and facecam areas separately, then arrange them without stretching either image.
Preview the entire clip after positioning each region. A crop that works at the beginning may miss action later. If necessary, adjust the framing across the clip or use a less aggressive crop. Do not fill the canvas at the expense of hiding the detail that makes the moment understandable.
4. Review Captions and Keep Overlays Clear
Add captions when spoken words are needed to understand the clip. Text, stickers, and automatic captions are available in the workflow described by the cited guide, though access to some features depends on the subscription plan. [c1] Check what your editor provides rather than assuming every option is included.
If you use automatic transcription, compare it with the audio. Pay particular attention to:
- Names and game terminology.
- Overlapping speech.
- Missing words or incorrect punctuation.
- Captions that appear too early or disappear before the line finishes.
Keep captions brief enough to read and place them where they do not cover the action. Use opening text to supply missing context, not to promise a result the clip does not show.
If your editor offers a safe-zone preview, use it when positioning text or stickers. The cited guide recommends this preview to account for TikTok’s like, share, and comment controls. [c1] Treat it as an aid rather than a guarantee: check the posting preview too, and keep essential text away from areas shown as obstructed.
5. Export and Check the Finished Video
Choose your output settings, render the clip, and save the finished file. These are the final editing steps described in the cited guide. [c1]
Use these editing checks when choosing settings:
- Match the export to the canvas. If you edited on a 9:16 canvas, keep that aspect ratio in the exported video.
- Inspect the output dimensions. Make sure the export is not unintentionally using the original horizontal layout.
- Avoid unnecessary upscaling. Enlarging low-resolution footage is not a substitute for a clearer source; judge the result in the exported file.
- Check format compatibility. Confirm current accepted formats and limits in TikTok’s upload interface rather than relying on this guide as a specifications table.
Review the exported file, not just the editing timeline. Watch once with sound to check speech and timing, then without sound to assess whether the captions and visible action communicate the moment. Inspect the posting preview for obscured text or framing problems before publishing.
Final Review Checklist
- I have checked permission to reuse the footage and included material.
- The opening supplies enough context for someone unfamiliar with the stream.
- The edit preserves the meaning of the original moment.
- Gameplay, facecam, and necessary interface details remain visible throughout.
- Captions match the audio and are readable.
- The export matches the intended vertical canvas.
- Essential text is clear of interface overlays in the posting preview.
- The exported file plays correctly with and without sound.
- The title and description accurately describe the clip.
Evidence limits: The cited source is a commercial editing guide, not official Twitch or TikTok documentation. It supports the workflow and the tool options noted here, not current platform specifications, content permissions, guaranteed reach, or tool-performance claims. The layout and review suggestions are editorial recommendations; no method described here guarantees more views.
FAQ
Do I Need a Full Twitch Vod to Make a TikTok Clip?
No—not for this workflow. You can begin with an existing Twitch clip link or a local video file if your editor supports that input, rather than importing a full broadcast. [c1] Choose footage that contains enough setup and payoff to stand on its own.
What If My Editor Does Not Accept Twitch Links?
The cited guide describes both clip-link and local-file inputs. [c1] If your editor only accepts files, prepare a video file you have permission to use, then import it through the editor’s upload or import option. This guide does not provide a Twitch download-menu walkthrough.
Do I Have to Include My Facecam?
No. The cited guide describes layouts both with and without a facecam. [c1] Gameplay alone may be sufficient when the action explains the moment. Include the facecam when the reaction adds necessary meaning, while keeping enough gameplay visible to explain it.
What Aspect Ratio Should I Use?
Use a 9:16 vertical canvas as an editing starting point, then export at the same ratio. Check that the crop preserves the important action and interface details; the cited guide includes selecting source regions and layouts for that purpose. [c1] This recommendation is not a complete statement of TikTok’s current upload requirements.
How Do I Keep TikTok Controls from Covering Captions?
Use a safe-zone preview if your editor provides one, and check the posting preview before publishing. The cited guide recommends safe zones to account for TikTok’s like, share, and comment buttons. [c1] Keep essential text away from areas shown as obstructed rather than assuming one placement works for every video.