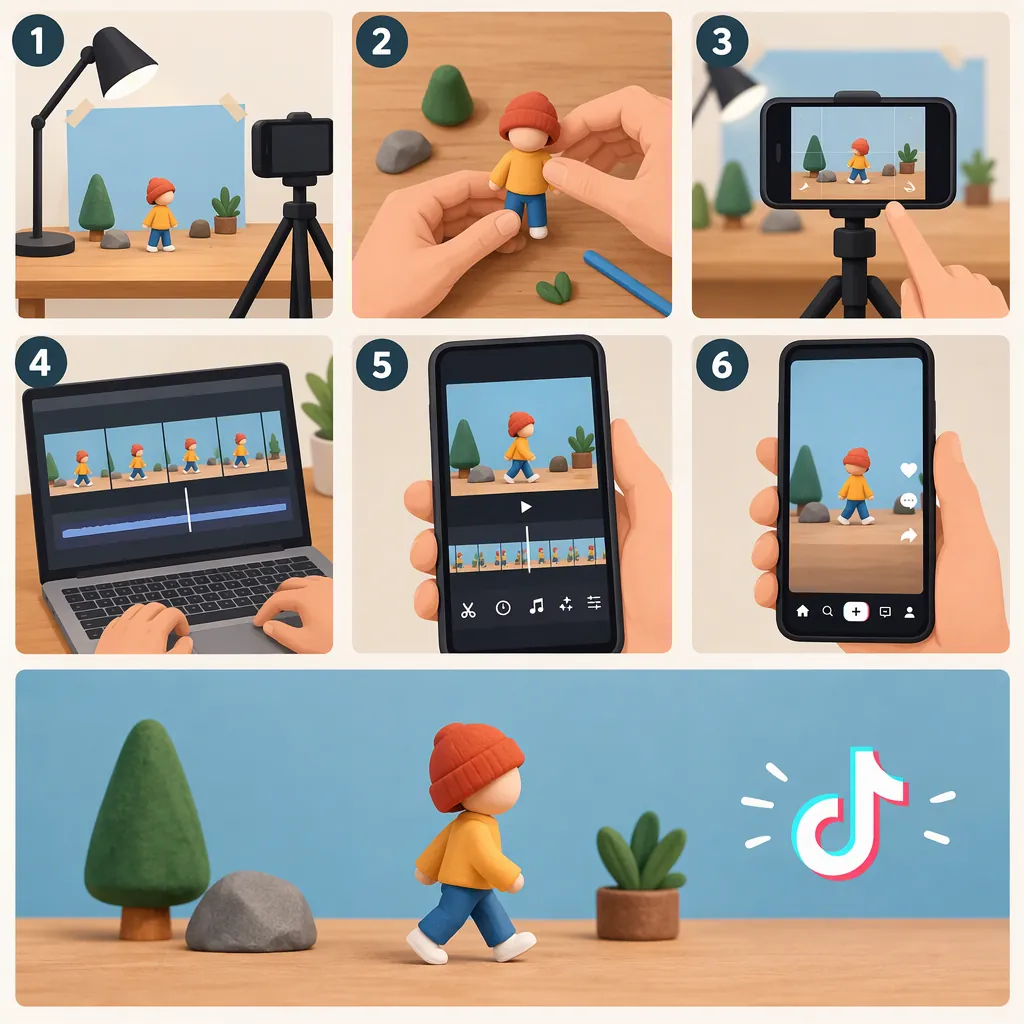
How to Make a Stop Motion Video for TikTok
To make a stop motion video for TikTok, keep your phone still, photograph an object, move it slightly, and repeat. Arrange the photos in order in an editor, adjust how long each photo appears, and export the sequence as a video. Then upload it to TikTok and check the publishing preview before posting.
This guide uses separate photo capture and editing rather than relying on TikTok’s current in-app stop motion controls. The available reference lists CapCut stop motion templates; it does not document a native TikTok capture workflow. [c1]
Stop Motion Vs. Time-Lapse
Stop motion creates movement by deliberately repositioning a subject between photographs. Time-lapse shows a scene changing over time without you repositioning the subject between shots.
Choose the method that fits your idea:
| Method | What happens between shots | Example |
|---|---|---|
| Stop motion | You move or change the subject | A paper shape slides across a desk |
| Time-lapse | The scene changes as time passes | Clouds move across the sky |
| Sped-up video | You record continuously, then increase playback speed | A long drawing session becomes a short clip |
A sped-up recording can show a process quickly, but it is not the same capture method as taking photographs at intervals.
1. Plan the Shot and Stabilize the Phone
Start with one short action and a clear ending. For example, a paper circle could travel across the frame and disappear behind a book.
Before taking photographs:
- Position the phone vertically if you want a portrait composition.
- Use a stable support and avoid moving the phone between shots.
- Mark the subject’s starting and ending positions outside the visible frame.
- Use steady lighting and avoid casting your shadow over the scene.
- If your camera provides focus and exposure locks, consider using them to reduce changes between shots.
- Leave room around the action for any text you plan to add.
Take a few test photographs. Check that the subject is clear and has enough room to complete its movement.
Simple Stop Motion Shot Plan
- Subject: A paper circle.
- Action: Move from the left side of the frame to the right.
- Camera: Fixed in one position.
- Lighting: Keep the same light throughout the sequence.
- Capture pattern: Photograph, move slightly, remove hands, photograph again.
- Ending: Hold the final position briefly in the edit.
- Test: Preview a short sequence before continuing.
2. Capture One Small Movement at a Time
- Photograph the starting position.
- Move the subject a small distance.
- Remove your hands and let the setup settle.
- Take the next photograph.
- Repeat until the action is complete.
Try to keep the movement increments similar for a consistent-looking result. Use smaller increments where you want more gradual movement, or deliberately vary them for a jumpy effect.
Review a short sequence early rather than waiting until the whole action is photographed.
| Problem | What to check |
|---|---|
| The background shifts | Check the phone support and whether you touched the camera |
| Brightness changes between shots | Look for moving shadows or changes in lighting |
| Hands appear in the sequence | Remove them fully before each photograph |
| The movement jumps unexpectedly | Check for missing photos or unusually large movement increments |
Correct the setup before continuing when possible. That avoids having to rebuild the entire sequence later.
3. Test Your Editor Before Importing Everything
Use an editor that can arrange still images and control their display duration. Before committing to it, import a small set of test photos and confirm that you can:
- Put the photographs in capture order.
- Set a short display duration for each photo.
- Apply the same duration to multiple photos, if you want to avoid adjusting each one individually.
- Remove or disable automatic transitions between photographs.
- Export the sequence as a video rather than a slideshow of separate images.
Preview the test export. If the editor cannot produce the timing you need, choose a different one before assembling the full project.
Do You Need a Template?
A template is optional for this workflow. You can assemble the photographs directly in an editor with suitable image-timing controls.
CapCut’s template page lists stop motion templates, but the listing does not establish a particular template’s timing controls, regional availability, pricing, or export conditions. Check those details before using one. [c1]
4. Set the Timing and Export the Video
Import the full photo sequence in capture order. Apply a short, consistent photo duration as a starting point, then preview the action.
Use this calculation to plan the sequence:
Sequence duration = number of photographs × display time per photograph
For example, 60 photographs displayed for 0.1 seconds each produce a six-second sequence, before any opening or ending holds. This is a calculation example, not a TikTok duration limit or a recommended setting for every project.
Adjust the edit based on what you see:
- Too slow: Shorten the photo durations.
- Hard to follow: Lengthen the durations or add a hold at an important moment.
- Unwanted pauses: Check for accidental duplicates or inconsistent photo durations.
- Soft transitions instead of direct movement: Remove transitions between photographs.
- Distracting frames: Remove photos containing hands or other accidental interruptions.
If you add text, give viewers enough time to read it without obscuring the main action.
Export the sequence as a video and watch the exported file from start to finish. Check the framing, photo order, timing, and any text—not just the editor’s preview.
5. Upload to TikTok and Check the Preview
Upload the exported video to TikTok. Before publishing, review it in the publishing preview:
- Framing: Is the entire action visible, or has part of it been cropped?
- Text placement: Is important text clear of on-screen controls and other overlays?
- Playback rhythm: Does the movement still read at the intended speed?
- Beginning and ending: Does the viewer have enough time to understand the scene?
- Additional edits: If you make changes during upload, check the sequence again afterward.
If the composition or timing no longer works, revise the edit and export another version. These checks do not depend on particular TikTok menu names or assume a native stop motion effect is available.
Use a Different Capture Plan for Time-Lapse
For time-lapse, keep the camera still and let the scene change without repositioning the subject between shots. If your camera offers an interval or time-lapse mode, test it briefly before starting a longer session.
Choose the interval according to how quickly the scene changes. Closer intervals capture more stages of faster action; wider intervals may suit slower changes. Preview a sample rather than assuming one setting will work for every subject.
Time-Lapse Timing Example
As a calculation example—not a recommended camera setting:
- Capture one photograph every 5 seconds.
- Continue for 10 minutes, or 600 seconds.
- You will have approximately 120 photographs.
- Display each photograph for 0.1 seconds to create approximately 12 seconds of video.
The exact photo count depends on whether the camera captures at the start, at the end, or both. Extra holds also change the final duration.
Use this relationship to work backward from the clip you want. If a short test misses important changes, try a closer capture interval. If it produces more photographs than you need, consider a wider interval or adjust playback timing.
If you already have a continuous recording, an editor with speed controls may let you shorten it by increasing playback speed. Treat that as a separate editing workflow, not as evidence of a native TikTok time-lapse feature.
FAQ
Can I Make Stop Motion Entirely Inside TikTok?
This guide does not verify TikTok’s current in-app stop motion tools. The available reference covers CapCut templates, not native TikTok capture controls. [c1] To avoid relying on a specific effect, capture photographs separately, assemble them in an editor, and upload the exported video.
How Many Photos Should I Take?
Work backward from your intended duration and photo timing:
Number of photos = intended sequence duration ÷ display time per photo
For example, a five-second sequence with each photo displayed for 0.1 seconds needs 50 photos, excluding extra opening or ending holds. Test a short sequence before photographing the full action.
Do I Need a Stop Motion Template?
No. The photo-by-photo workflow only requires an editor that can sequence still images, adjust their timing, and export a video. A template is optional; the available CapCut listing does not establish which template would suit your project. [c1]
Why Does My Stop Motion Look Shaky or Flicker?
Check whether the camera moved, the lighting changed, or your shadow crossed the scene. Stabilize the phone, keep the lighting consistent, and use focus and exposure locks if your camera offers them. Preview a few photographs before continuing.
Can I Upload a Time-Lapse Instead of Stop Motion?
Yes—the workflow described here is to create a finished video separately and upload it to TikTok. For time-lapse, let the scene change between captures instead of manually moving the subject. Check the exported video and the TikTok publishing preview for framing and playback rhythm before posting.