How to Make a Reaction Video on TikTok
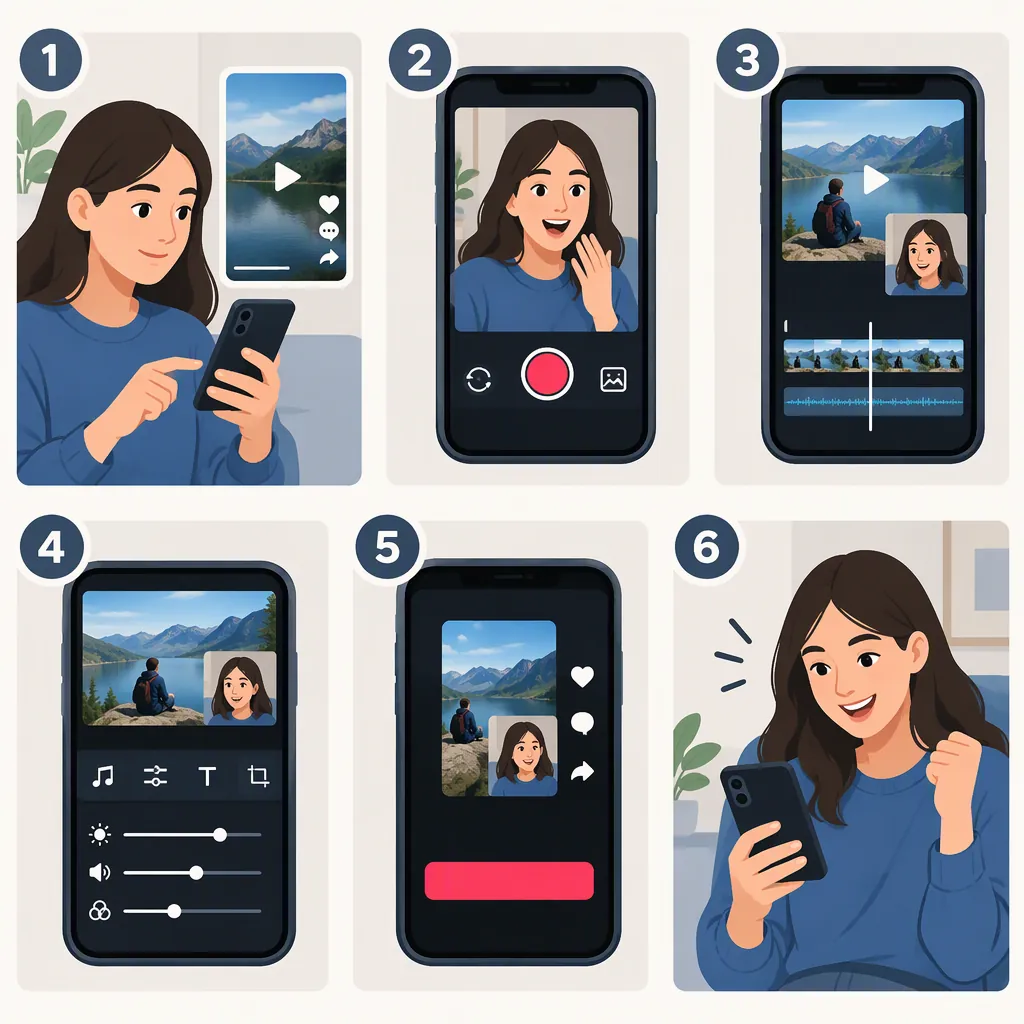
To make a reaction video for TikTok, choose source material you have permission or another valid basis to reuse, record your response, and combine the clips in a split-screen or picture-in-picture layout. Align your commentary with the relevant moments, balance the audio, check captions, and save the finished video for upload. This general editing workflow is supported by CapCut’s reaction-video guide. [c1]
This tutorial covers making a TikTok-ready reaction or standalone video reply in an external editor. It is not a verified button-by-button guide to TikTok’s current Duet, Stitch, native comment-reply, or upload controls; the available source does not establish those procedures.
1. Choose Your Reaction or Reply Format
Choose a format based on what viewers need to see to understand your response.
| Format | Use it when | What to prepare |
|---|---|---|
| Side-by-side reaction | Your expressions and the source both matter throughout | Source footage and a camera recording of your reaction |
| Picture-in-picture reaction | One clip needs more screen space than the other | Source footage and a reaction clip positioned as an inset |
| Comment-focused reply | You are answering a question rather than reacting to footage | An accurate statement of the question and your recorded answer |
Split-screen and picture-in-picture are documented ways to display source footage and a reaction simultaneously. [c1] Keep an inset away from important text, faces, or action.
For a comment-focused reply, you may not need another video at all. A spoken or written paraphrase of the question can provide enough context.
2. Prepare the Source Material
Pick the specific moment you want to discuss. Write down what your response adds: an explanation, disagreement, observation, or interpretation. Avoid including an entire clip when a selected moment would communicate your point.
Before recording:
- Confirm that you have permission or another valid basis to include the source footage and its audio.
- Note the words or actions your commentary will address.
- Plan which source moments viewers need to understand your response.
- If reuse rights are unclear, consider a commentary-only video without reproducing the material.
Editing does not establish legal clearance. Shortening a clip, adding commentary, changing its appearance, or replacing its audio is not proof that a particular use is permitted. The cited guide discusses reuse precautions, but it cannot determine the rights for your chosen material. [c1]
3. Record Your Reaction with the Devices You Have
Position your phone so your face is visible, light your face evenly, and record a short sound test. Listen for unclear speech and background noise before recording the full response. The reaction-video guide recommends a quiet recording environment and keeping your reaction synchronized with the source. [c1]
If You Have a Second Playback Device
Use one device to play the permitted source material and your phone to record your face and commentary.
- Choose a recognizable word, sound, or action as your timing reference.
- Start your camera recording before starting playback.
- Record your response while watching the source.
- Note the reference moment so you can find it in both clips during editing.
Consider listening through headphones so the source playback does not also enter your microphone. If your recording still contains source sound, check for doubled audio when you combine the tracks.
If You Have Only One Phone
A straightforward alternative is to record commentary after viewing the source, rather than trying to play and record it simultaneously.
- Watch the selected material.
- Write down a timestamp and a brief description of each moment you want to address.
- Record your explanation with source playback stopped.
- Align each comment with its corresponding source moment in the editor.
Label this as commentary rather than a first-time reaction if you have already watched the material. You can also pause the source in your edit while explaining a point, instead of trying to speak over continuous playback.
4. Combine and Synchronize the Clips
Use an editor that can display two clips in the same frame. CapCut’s guide gives a mobile example: import the main video, add the camera recording as an overlay, and arrange the clips in picture-in-picture. This is a documented example, not a requirement to use that editor. [c1]
Import and Arrange
Add your source and reaction recording to the project. Set up a side-by-side layout or resize one clip as an inset.
For a vertical composition, check that your face and essential source details remain visible. Do not crop out context needed to understand the response.
Align a Specific Moment
Match your reaction to the source event that prompted it, rather than simply aligning the beginnings of both files.
Example: Suppose a speaker says “the result doubled” at 00:08 in your selected source clip. Find that phrase on the source timeline, then place your corresponding response at that point—or just after it, if viewers need to hear the phrase first.
For a live reaction, use the timing reference captured during recording to align the clips. For recorded commentary, place each explanation beside the relevant source moment or pause the source while you explain.
Play through later moments too. A correctly aligned opening does not replace a full timing check.
Trim, Balance Audio, and Check Captions
- Trim deliberately: Remove setup time and unnecessary pauses without changing the meaning of the source or your response.
- Keep speech clear: Lower competing source audio while you speak; retain source audio where viewers need to hear it.
- Check for doubled sound: If the microphone captured source playback, avoid leaving two competing copies audible.
- Review captions: Correct names and unclear words, and move text away from important visual details.
Preview the composition at phone-screen size before saving.
5. Make a Clear Video Reply to a Comment
For a reply, lead with the question rather than a long introduction. State or paraphrase it accurately, give your direct answer, and include only the explanation needed to make that answer understandable.
Use this outline:
- Question: What exactly am I answering?
- Answer: What is my response in one sentence?
- Explanation: Which example or detail makes the answer clear?
- Context check: Have I represented the question accurately?
- Privacy check: Can I remove unnecessary identifying information?
If you include a screenshot, review usernames, profile photos, and unrelated personal information. Consider whether paraphrasing would provide the same context with less exposure.
A standalone reply is not the same as a native comment-linked reply. Do not assume that uploading your edited video will attach it to the original comment. That behavior is not documented by the available source.
6. Save, Review, and Prepare for TikTok Upload
Export the finished video, then watch the saved file—not just the editor preview—from beginning to end. Treat export settings as a compatibility decision, not a guarantee of better reach or engagement.
Before uploading, check that:
- The source footage and audio have been reviewed for permission or another valid basis for reuse.
- Your response adds a clear point rather than merely replaying the source.
- Commentary matches the relevant source moments.
- Speech is understandable without competing or doubled audio.
- Captions are accurate and do not cover essential content.
- Trimming preserves context.
- Unnecessary personal information has been removed.
- The saved file plays correctly.
Prepare the saved file for upload through the TikTok interface available to you. During any available preview, check the framing and text placement again before publishing.
FAQ
Can I Make a TikTok Reaction Video Using Only My Phone?
Yes. The cited guide describes a mobile workflow that imports the main video, adds a camera recording as an overlay, and displays both clips in picture-in-picture. [c1] With one phone, you can watch the source first, record commentary separately, and align the clips afterward.
Should I Use Duet, Stitch, or a Comment Video Reply?
First decide whether you need to show source footage alongside your response, discuss selected moments, or answer a written question. Then check which native options are available on the relevant TikTok video or comment.
The available source does not verify current steps or eligibility for Duet, Stitch, or native comment replies. The external-editor workflow above covers a reaction video or standalone reply without relying on those controls.
How Do I Keep My Reaction in Sync?
Choose a recognizable source moment and align the corresponding reaction with it. For example, locate a specific phrase at 00:08 and position your response where that phrase occurs. Check the rest of the video after aligning the opening; the guide emphasizes keeping the reaction synchronized with the source. [c1]
Does Adding Commentary or Credit Make a Clip Safe to Reuse?
No. This workflow does not establish permission or resolve copyright questions. The cited guide’s reuse suggestions cannot determine whether your particular footage, soundtrack, or planned use is permitted. Resolve those questions separately before including the material. [c1]