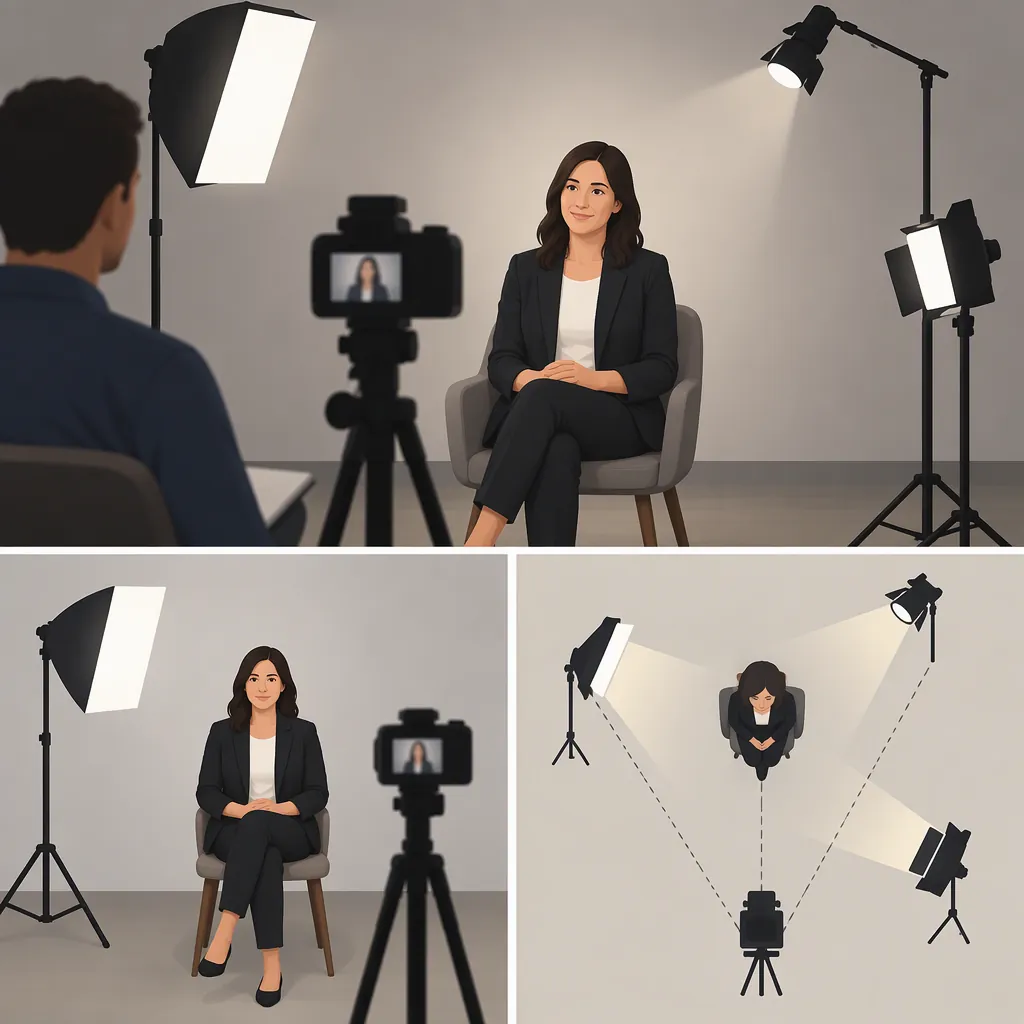
Interview Lighting: Choosing a Simple or Three-Point Setup
Start interview lighting with a large, soft key, then evaluate the shadow side of the face and the subject’s separation from the background. Add fill when shadows need lifting; use negative fill when room reflections make the face look too flat. Add a backlight only if lighting the subject from behind improves separation—a contrasting background may already do the job. [c1]
The bounce-light method below comes from Art Adams’s November 18, 2011 article, “The Simplest, Fastest Interview Lighting Setup–Ever.” It is one practitioner’s published approach, not a comparative equipment test or a universal placement formula. His preference for background tonal contrast instead of a backlight is a stylistic choice. [c1]
Think in Lighting Roles, Not Lamp Counts
Three-point lighting describes three roles:
- Key: The main illumination on the face.
- Fill: Light that lifts the shadow side of the face.
- Backlight: Light directed onto the subject from behind to help distinguish them from the background.
These roles do not necessarily require three powered lamps. A reflector can provide fill. Negative fill serves a different purpose: it reduces reflected room light rather than adding illumination. Adams combines a bounced key with negative fill and a small white reflector when additional fill is needed. [c1]
A background light is also different from a backlight. One illuminates the setting; the other illuminates the subject from behind. Adams describes setups with one light on the foreground and another on the background, as well as examples with multiple background lights. Neither lamp count alone makes the arrangement three-point lighting. [c1]
The useful question is not “Have I used three lights?” It is “Does the face have readable shape, and does the subject separate from the setting?”
Build the Soft Key First
Adams creates a large apparent light source by directing a lamp into a white bounce card. His example uses a 4-by-4-foot card roughly 2–3 feet from the subject. Those dimensions describe his setup; they are not requirements for every room or face. [c1]
Use the following sequence:
- Illuminate the whole bounce surface. A small illuminated patch acts as a smaller source and produces harder shadows than the fully illuminated card. [c1]
- Start with the source slightly above the subject. Adams generally uses this height to direct the remaining nose shadow downward. [c1]
- Inspect both eyes and the nose shadow through the camera. Face shape and eye depth can require a different placement; refine the arrangement for the seated person rather than keeping it fixed between interviews. [c1]
Judge the light in the intended framing. A soft source is a starting point, not a substitute for checking whether the eyes and facial contours remain readable.
Choose Fill or Negative Fill
A soft key does not automatically produce the desired contrast. In a small room with reflective walls, light can return to the shadow side and make the face look too evenly illuminated. Adams places a large black card on that side to reduce the unwanted reflection. [c1]
Choose the next adjustment according to what the camera shows:
| What you see | Adjustment to try | What to recheck |
|---|---|---|
| The face looks flat despite a directional key | Introduce negative fill on the shadow side | Whether the face gains shape without making the eye area too dark |
| The shadow side is too dark | Introduce a small white reflector | Whether the eye and front of the face become readable |
| The cheek and ear receive fill, but the eye remains dark | Move the reflector toward the front of the negative-fill card | Whether fill reaches the front of the face |
These adjustments follow Adams’s method: reduce unwanted ambient reflection with the black card, then return a controlled amount of fill with a smaller white surface. He places white paper toward the front of the card, at head height; placing it farther back can light the cheek and ear while leaving the fill-side eye dark. [c1]
Adjust one element at a time. If more fill is needed, Adams describes adding another sheet of white paper rather than automatically introducing another powered light. [c1]
Compare Simple and Three-Point Interview Lighting
Choose the arrangement based on an observable problem, not a predetermined lamp count.
| Arrangement | When to consider it | Limitation or next check |
|---|---|---|
| Soft key with fill control | The face has readable shape and the existing background already distinguishes the subject | Fill adjustments may improve the face without solving poor background separation |
| Soft key with a background light | The face looks right, but the background needs a different tone to distinguish the subject | Evaluate the background separately; this does not add light to the subject’s rear edge |
| Key, fill, and backlight | The face looks right, but you want to test whether a lit edge improves separation | Check whether that edge is distracting or introduces unwanted light elsewhere |
Adams often chooses background tonal contrast instead of a backlight. That provides a reason to test the simpler arrangement first, not a rule against three-point lighting. [c1]
A Practical Three-Point Setup Sequence
Once the key is established, use this image-based workflow to evaluate a three-point arrangement:
- Set the key with the backlight off. Establish the facial illumination before judging separation.
- Add or adjust fill. Lift the shadow side only as much as the intended image needs. A white reflector is an option; Adams’s method shows how to combine it with negative fill for controlled contrast. [c1]
- Test a light from behind the subject. Observe the edge it creates in the actual framing. Compare the image with that light on and off.
- Check for an overly prominent edge. If the lit outline draws attention away from the face, reduce the backlight’s contribution or change its aim, then compare again.
- Check for unintended spill. Look for changes on the face or background that you did not intend. Adjust the light’s aim or placement and repeat the on/off comparison.
- Test expected movement. Have the subject turn and lean as they are likely to during the interview. Keep the backlight only if its effect remains useful.
These are evaluation steps, not fixed placement or intensity specifications. Adams’s article does not provide a backlight formula or key-to-fill ratio, so the workflow does not assign one.
Troubleshoot Before Recording
Test with the person seated in position, not with an empty chair. Adams identifies reflective glasses and subjects leaning into the beam that illuminates the bounce as limitations of his method. He also describes remedies for bounce-surface hotspots and direct lamp spill. [c1]
| Symptom | Adjustment to try | Recheck |
|---|---|---|
| A glossy bounce surface creates a hotspot or an unexpected shadow | Cover the shiny surface with a matte material, such as muslin | Whether the hotspot disappears and the facial shadows remain soft |
| Direct lamp light reaches the subject instead of only the bounce | Move the lamp behind the black negative-fill card so the card also blocks the unwanted light | From the subject’s position, check whether the lamp’s stray light is still visible |
| A barn door reflects lamp light toward the subject | Inspect its orientation; Adams describes opening the offending far barn door fully when it cannot be hidden behind the card | Whether the reflection has stopped reaching the subject |
These remedies are described in Adams’s article. The black card can perform two jobs: reducing reflected room light and acting as a flag to block direct lamp spill. He specifically warns about light escaping through the gap between the lamp and its barn doors, as well as reflections from shiny barn-door surfaces. [c1]
For glasses, reconsider the large source’s placement and inspect the reflection through the camera; do not assume the starting arrangement will work unchanged. For leaning, check whether the subject enters the direct beam aimed at the bounce. Adams identifies both as cases where the method may need reconsideration. [c1]
Interview Lighting Test Checklist
- Inspect both eyes and the nose shadow in the intended framing. [c1]
- Decide whether the shadow side needs more fill or less reflected room light. [c1]
- Confirm that the subject separates from the background.
- If using a backlight, compare it on and off for useful separation, distracting brightness, and unintended spill.
- Inspect glasses and test expected leaning and head movement. [c1]
- Confirm that the whole intended bounce surface is illuminated. [c1]
- Check for bounce hotspots, direct lamp spill, and barn-door reflections. [c1]
- Recheck the image after each adjustment.
FAQ
Do Interview Shoots Always Need Three Lights?
No. Adams describes using one light on the foreground and another on the background, with reflective fill and negative fill controlling the face. He often relies on background tonal contrast instead of a backlight. Lamp count alone does not determine whether an interview image works. [c1]
When Should I Switch from a Simple Setup to Three-Point Lighting?
First establish the face with the key and fill control. If separation still needs attention, compare a background adjustment with a backlight test. Adams’s method demonstrates the background-tone option; his decision to omit a backlight is a preference, not a requirement. [c1]
Keep the backlight if its visible contribution suits the image without creating a distracting edge or unwanted spill.
When Should I Use Negative Fill?
Consider negative fill when reflected room light makes the face look too evenly illuminated. A dark surface on the shadow side reduces that reflection. If the result becomes too dark, a smaller white reflector can return controlled fill. [c1]
Is There One Correct Key-Light Position for Every Interview?
No. Adams discusses differences in face shape and eye depth that affect placement. His large bounced source generally starts slightly above the subject, but the visible eye and nose shadows should guide adjustments. [c1]
How Can I Fix a Hotspot or Direct Spill in a Bounce Setup?
For a hotspot caused by a shiny bounce surface, Adams suggests covering it with a matte material such as muslin. For direct lamp spill, he moves the lamp behind the negative-fill card so the card also acts as a flag, then checks for light leaking around or reflecting from the barn doors. [c1]