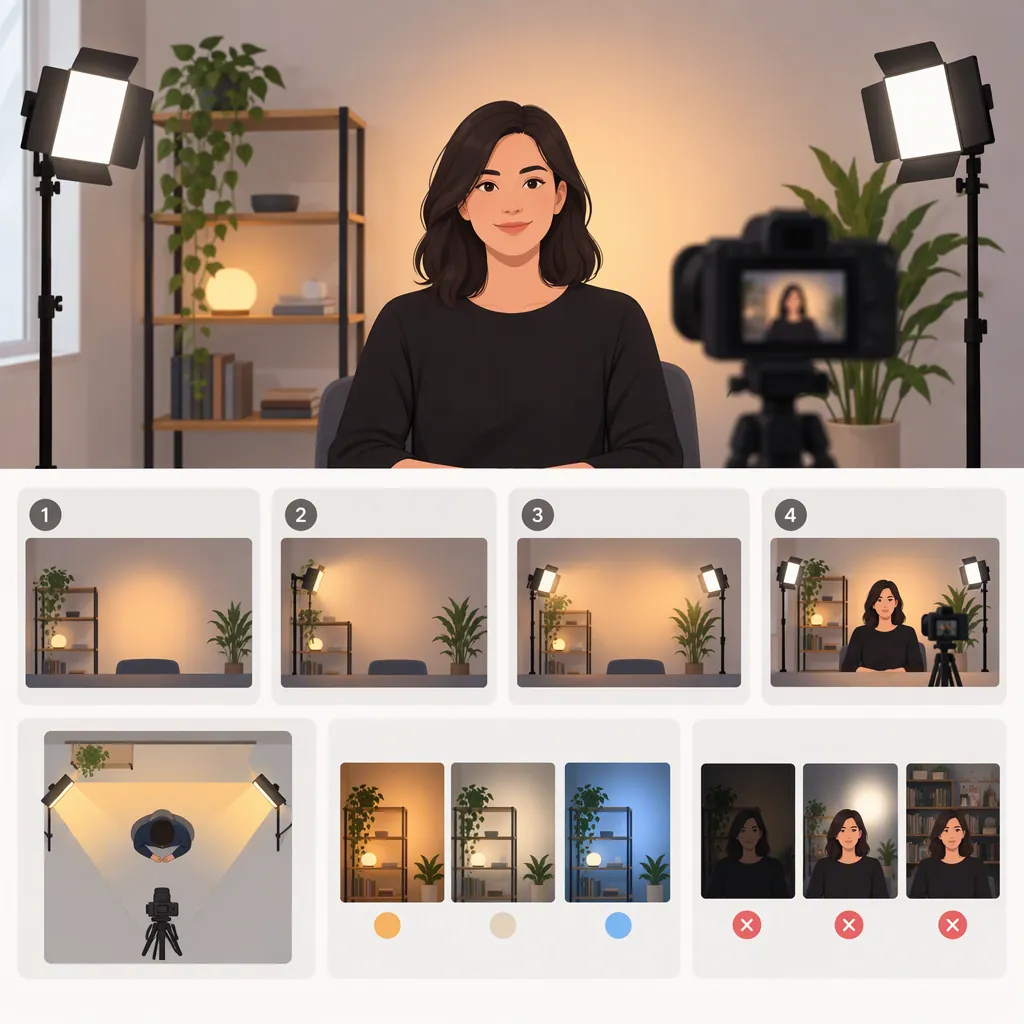
Background Lighting for Video: How to Set up Backdrop and Rim Lights
Choose background lighting for video by deciding what needs illumination: the backdrop or the subject’s outline. Establish the main light on the subject first, then test a light aimed at the background or positioned behind the subject. Diffusion can soften the light, while light shapers help control where it falls. Judge the result in the camera frame, not by how bright the setup looks in the room. [src-1]
Separate Background Lighting from Rim Lighting
For this guide, the two roles are distinct:
- Background lighting illuminates the wall, backdrop, or objects behind the subject.
- Rim lighting uses light from behind the subject to emphasize an edge or outline.
Lighting terminology varies. The VideoStudio guide describes a “background light” coming from behind the subject and separately discusses backlighting that makes a subject’s outline glow. Choose according to the intended effect rather than the label alone. [src-1]
Before setting up, complete this sentence: “The additional light should make ___ easier to see.”
If the answer is a wall or background object, start with backdrop illumination. If it is the subject’s outline, start with a rim-light test. Test these roles separately before combining them.
A visible lamp or similar source within the scene is called a practical light. Treat it as an additional composition element rather than a substitute for either role. [src-1] With your subject lighting established, check whether the practical looks distractingly bright or changes the subject’s appearance before deciding whether to adjust it.
Choose Light Control Before Fixture Type
The useful question is not simply which type of light to use, but whether you can direct and shape its illumination. Diffusers soften light, reflectors redirect it, color gels change its color, and light shapers control the size and shape of the illuminated area. [src-1]
| Intended effect | Starting approach to test | What to inspect in the frame |
|---|---|---|
| A softly illuminated backdrop | Diffused or reflected light directed toward the backdrop | Background visibility and unwanted shadows |
| A localized background accent | A shaped beam aimed at one background element | Whether light extends beyond the intended area |
| An illuminated subject outline | A light behind the subject, aimed toward the edge you want to emphasize | Outline width, prominence, and unwanted illumination on the face |
| Color in the background | A background light with a color gel | Whether the color also reaches areas you wanted to keep neutral |
When comparing available equipment, check whether it can sit outside the camera frame, illuminate the intended area, and accept compatible diffusion or shaping accessories. Choose by the effect you can control—not by assuming a lighting technology guarantees a particular result.
Build the Setup One Light at a Time
Begin with the key light, which provides the main illumination on the subject. Assess whether you need fill to reduce shadows; a reflector can provide a fill effect without adding another fixture. One-, two-, and three-light arrangements are all described in the lighting guide, so three lights are not a requirement. [src-1]
Use this sequence:
- Set the composition. Decide which background elements belong in the shot.
- Establish subject lighting. Adjust the key light and any fill before adding a background or rim light.
- Record a baseline. Capture a short clip with subject lighting only.
- Add one lighting role. Use one of the starting examples below.
- Change one variable at a time. Adjust direction, position, diffusion, or shaping separately.
- Compare recordings. Keep the change only if it supports your intended emphasis.
Example Starting Layout: Backdrop Illumination
This is a suggested first test, not a universal placement standard.
- Place the additional light to one side of the set, outside the shot. Aim it toward the wall or background object you want to show, rather than toward the subject.
- Check the actual camera frame. Confirm that neither the fixture nor an unwanted bright area has entered the composition.
- Adjust direction first. If the light also illuminates the subject, turn it farther toward the intended background area and record another test.
- Then control the illuminated area. Try a compatible light shaper if the beam still extends beyond your target. For a softer treatment, test diffusion or reflected light. These controls shape or soften illumination in different ways. [src-1]
- Inspect shadows and emphasis. If the backdrop has distracting shadows, test a different position or diffusion. If it dominates the shot, compare a version with less background illumination.
The goal is to show the chosen background element without unintentionally changing the subject lighting.
Example Starting Layout: Rim Lighting
This is also a suggested test layout, with no fixed distance, height, or output.
- Place the light behind the subject and slightly to one side, outside the camera frame. Aim it toward the edge you want to emphasize, such as one side of the head or shoulder. Backlighting can create an illuminated outline. [src-1]
- Check framing before judging the effect. Move the fixture farther outside the shot if it is visible, then re-aim it.
- Adjust direction first. If the light spreads across the face or the outline looks too broad, turn it away from the front of the subject while watching the frame.
- Adjust position next if needed. Try a position farther around behind the subject, then re-aim and compare.
- Use shaping or reduce the effect. Test a compatible light shaper for unwanted spill, or compare a version with the rear light reduced or switched off. Light shapers control the beam’s outer size and shape. [src-1]
Keep the key light established during this test. An outlined subject and a silhouette are different effects: the guide describes backlighting without key or fill as a way to create a silhouette. [src-1]
Three-Clip Setup Test
Record three short clips with the same composition and camera settings:
- A: Subject lighting only
- B: Subject lighting plus backdrop illumination
- C: Subject lighting plus a rim-light test
Compare subject clarity, background visibility, outline prominence, distracting bright areas, and unintended shadows. If both additional roles seem useful, test them together only after evaluating them separately.
Troubleshoot What Appears in the Image
Lighting direction, subject visibility, mood, and shadow control matter more than adding lights for their own sake. Illumination that emphasizes the wrong elements can work against the scene. [src-1]
Use these diagnostic tests, changing one variable at a time:
| Visible problem | First adjustment to test | What to check next |
|---|---|---|
| The background draws too much attention | Reduce its illumination or narrow the illuminated area | Whether the subject remains the intended focus |
| Background light reaches the subject | Redirect it toward the backdrop | Whether shaping or a different position is still needed |
| The rim is too wide or lights the face | Re-aim away from the front of the subject | Whether moving the light farther behind improves the outline |
| The rim is too prominent | Reduce it or compare with it switched off | Whether the outline still supports the scene |
| Backdrop shadows are distracting | Test diffusion or a different position | Whether the shadows soften or move out of the important area |
| Colored light changes the subject’s appearance | Redirect or shape the colored light | How the result compares with a neutral-light baseline |
Diffusion is a way to soften light; shaping controls its extent. Choose the adjustment that matches the visible problem rather than treating those controls as interchangeable. [src-1]
Keep One Setup Checklist
Use a single record instead of separate planning and troubleshooting forms:
- Role and target: backdrop illumination or subject outline; intended area.
- Position and direction: where the light sits and where it points.
- Control: diffusion, reflection, shaping, or color treatment.
- Frame problem: unwanted illumination, shadow, color change, or distraction.
- Test and decision: clip compared, adjustment made, and keep or revert.
Method and Evidence Limits
This guidance draws on one general VideoStudio lighting guide, which supports the lighting roles, setup sequence, and control methods discussed here. It is not a comparative fixture test and does not establish a best background light. [src-1]
The example layouts, recording exercise, and troubleshooting steps are suggested evaluation methods, not reports of firsthand testing. No universal output level, placement distance, lighting ratio, or camera setting is recommended. Keep a setup provisional until you have checked its effect in your recorded frame.
FAQ
Are Background Lights and Rim Lights the Same?
Not necessarily. Here, background lighting illuminates the backdrop, while rim lighting emphasizes the subject’s outline from behind. The reference uses “background light” for lighting from behind the subject, so identify the intended effect rather than relying on terminology alone. [src-1]
Do I Need Three Lights for a Video Background?
No. The guide describes one-, two-, and three-light setups, including using a reflector for fill. Establish subject lighting first, then test whether a separate background or rim light improves the image. [src-1]
Should I Use Diffusion or a Light Shaper?
Use diffusion when you want to test a softer effect. Use a light shaper when you need to control the size or shape of the illuminated area. If a light reaches an unintended part of the scene, start by checking its direction, then evaluate shaping rather than assuming diffusion will solve the problem. [src-1]
Should a Green Screen Be Lit Like a Decorative Background?
No—the goal is different. A green screen needs even illumination for chroma keying rather than a decorative accent. The guide recommends lighting it separately from the subject, using diffused light, and avoiding wrinkles and shadows on the screen. [src-1]