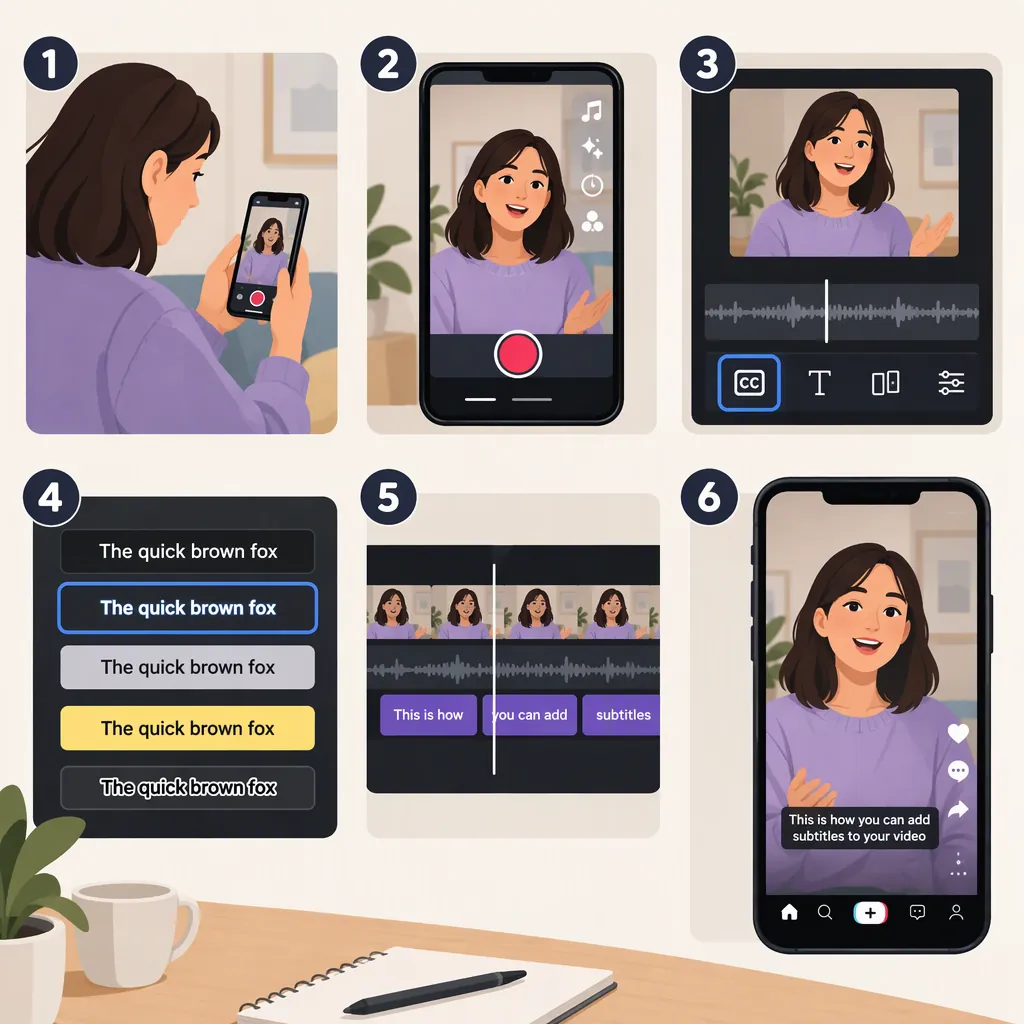
How to Make a TikTok Video with Subtitles
To make a TikTok video with subtitles, transcribe the speech, correct the wording, and add timed text in a video editor. You can create text layers manually or import a subtitle file your editor supports. Then embed the subtitles in the exported video and upload that finished video to TikTok. This external-editor workflow covers transcription, editing, subtitle-file export, and embedding before upload. [src_1]
Scope: This guide covers subtitles visible within the video, not the post description. Its supporting source is a third-party article dated July 25, 2022—not current TikTok documentation—so it does not verify TikTok’s current in-app caption controls. [src_1] The steps below are software-independent recommendations rather than instructions for specific buttons.
1. Prepare Your Video and Choose a Subtitle Workflow
Start with the video version you intend to publish. As a practical precaution, finish major cuts before timing subtitles so you do not have to repeat that work after moving or removing footage.
Choose one of these paths:
| Path | What you need | What you will do |
|---|---|---|
| Manual text layers | An editor with timed text controls | Create a text layer for each phrase and set its start and end times. |
| Subtitle-file import | An editor that accepts your subtitle format | Import the file, review the subtitle track, and correct its text and timing. |
Both paths should end with subtitles visible in the exported video, not just a separate transcript or subtitle file. Embedding subtitles in a video editor before uploading to TikTok is the workflow described by the source. [src_1]
Preparation Checklist
- Keep an original copy of the video.
- Choose the final video version to subtitle.
- Decide whether to type the speech or generate a draft transcript.
- Check whether your editor supports timed text, subtitle-file import, or both.
- If importing subtitles, confirm the accepted file format before exporting them.
2. Transcribe the Speech and Correct the Text
Create a draft of the spoken words manually or through automatic transcription. Automatic caption generation and manual text editing are both described in the supporting guide. [src_1]
Treat generated text as a draft. Listen to the video while reviewing each passage, paying particular attention to:
- Names and specialized terms.
- Numbers, dates, and measurements.
- Words spoken over music or background noise.
- Missing words or incorrect punctuation.
Preserve the speaker’s meaning rather than rewriting the speech as promotional copy. If an important sound conveys information that speech does not, consider a brief label such as “[Doorbell rings].” If you use translated subtitles, review them against the original meaning.
Transcript Review Worksheet
For each passage, record:
- Audio location:
- Draft wording:
- Corrected wording:
- Name, number, or term to verify:
- Important sound to describe:
- Ready for timing: Yes / No
3. Add the Subtitles in Your Video Editor
Use the path that matches your editor’s capabilities. Exact control names vary; these are general editing steps, not TikTok-specific interface instructions.
Path A: Create Timed Text Manually
- Open the video in your editor. Place it on the timeline and listen to the first spoken phrase.
- Create a text layer for that phrase. Enter the corrected wording rather than the unreviewed transcript.
- Set its start time. Align the beginning of the text layer with the point where the phrase is spoken.
- Set its end time. Adjust the layer’s duration so the phrase remains readable without continuing over unrelated speech.
- Repeat for each phrase. Use a separate timed text layer for each subtitle segment.
- Play the sequence continuously. Revise any text that appears too early, disappears too quickly, or overlaps another subtitle.
If a passage is difficult to read in the available time, try splitting it at a natural phrase boundary and checking the timing again.
Path B: Import a Subtitle File
- Export the corrected subtitles in a compatible format. The supporting guide lists SRT, VTT, and EBU-STL as subtitle export options; use only a format your editor accepts. These are not verified TikTok direct-upload formats. [src_1]
- Open the matching video in your editor. Use the same cut that was transcribed and timed.
- Import the subtitle file. Add it through your editor’s subtitle-import function, if available.
- Review the subtitle track against the audio. Check the beginning, middle, and end, then review the full sequence.
- Correct text and timing. Edit errors and adjust subtitle boundaries using the controls your editor provides.
- Check the export behavior. Choose an output that embeds or burns the subtitles into the video rather than exporting only a separate subtitle file.
The goal is a video in which the subtitles remain visible when you play the exported file on its own. The source supports embedding subtitles in an editor before uploading the finished video to TikTok. [src_1]
Teaching Example: Split a Sentence into Timed Subtitles
The following is an invented example for practice, not a TikTok timing rule.
Draft transcript: “Put the lid on then shake for ten second.”
Corrected transcript: “Put the lid on, then shake for ten seconds.”
| Illustrative start–end time | Subtitle text |
|---|---|
| 00:00.500–00:02.000 | Put the lid on, |
| 00:02.000–00:04.000 | then shake for ten seconds. |
The split follows two natural phrases: an initial action and the next instruction. In your video, set the boundaries from the actual speech and check whether each phrase is comfortable to read. Do not copy these example times.
4. Style the Subtitles and Check Readability
Once the text is accurate and timed, adjust its presentation. The source describes customizing subtitle font, size, color, and style. [src_1]
Use these as practical review recommendations, not platform requirements:
- Keep phrases readable. Break long passages at natural pauses without separating words that belong together.
- Choose clear text styling. Check that the font and text treatment remain readable over changing backgrounds.
- Protect important visuals. Avoid covering faces, demonstrations, labels, or other information viewers need to see.
- Preview at phone size. Do not judge readability only from a large editing window.
- Leave room for the viewing interface. Check placement again in TikTok’s upload preview rather than relying on a fixed position in the editor.
Subtitle Timing and Style Check
- Play each subtitle with the audio: does it match the speech?
- Pause on each subtitle: is the wording correct?
- Watch without pausing: is there enough time to read it?
- Check bright and dark scenes: does the text remain readable?
- Inspect key visual moments: does the text cover essential information?
- Check transitions between subtitles: do they overlap or leave unintended gaps?
5. Export the Subtitled Video and Review It Before Upload
Export the finished video with the subtitles embedded. A separate subtitle file alone is not the final output for this tutorial; the supported workflow embeds subtitles in the video before uploading it to TikTok. [src_1]
Open the exported video, not just the editor preview, and watch it from beginning to end:
- With sound: Check wording, missing speech, and synchronization.
- Without sound: Check whether the text communicates the spoken content and whether important sound information needs a label.
- At phone size: Check readability, placement, and clipping.
If the exported file has no visible subtitles, return to the editor and check whether the text layers or subtitle track are included in the video output.
Next, upload the finished video to TikTok and inspect the upload preview before publishing. If text is cut off, obscured, or duplicated by another text layer, revise the video or resolve the duplicate layer before proceeding.
Final Review Checklist
- Subtitles appear when the exported video plays on its own.
- Words, names, and numbers have been checked against the audio.
- Subtitle timing matches the speech throughout.
- Text remains readable on a phone-sized display.
- No essential visuals are covered.
- The upload preview has been checked for clipping, overlap, or duplicate text.
FAQ
Can I Generate Subtitles Automatically?
Yes—automatic caption generation followed by manual text editing is a supported workflow. Check the generated wording against the audio before adding it to your finished video. This guide does not verify TikTok’s current built-in automatic-caption options. [src_1]
Can I Upload an SRT File Directly to TikTok?
The supporting reference does not establish direct SRT upload support in TikTok. Its workflow exports a subtitle file, embeds the subtitles in a compatible video editor, and then uploads the finished video. Check your editor’s format support before exporting the subtitle file. [src_1]
Do I Need a Separate Subtitle File?
Not for the manual text-layer path described here. You can enter each phrase in an editor with timed text controls. If you choose a subtitle-file workflow, the source describes exporting the file and then embedding its subtitles in a video editor. Either way, this tutorial’s final output is a video with visible subtitles. [src_1]
Why Review a Subtitled Video with the Sound Off?
A sound-off review helps you assess whether the text communicates the spoken content without relying on audio. Subtitles can support viewers who cannot hear the dialogue or are watching without sound. They are not, by themselves, a guarantee of complete accessibility or higher engagement. [src_1]