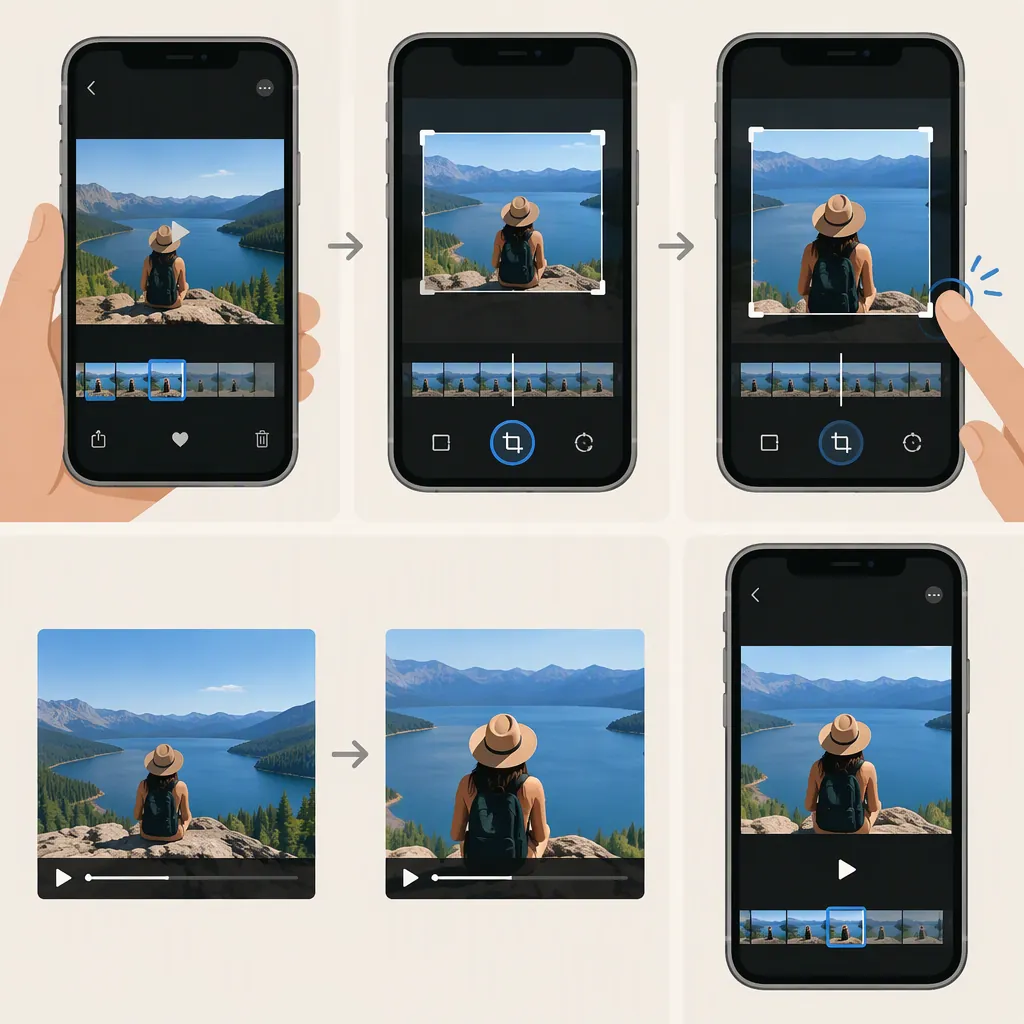
How to Crop a Video on iPhone with the Photos App
Open Photos, select your video, and tap Edit. Tap the Crop/Rotate button, then drag the crop frame’s corners to remove unwanted edges. For a preset shape, tap the aspect ratio icon and choose a ratio. Tap Done to save. The provided cropping guide describes this workflow for iOS 13 or later; control placement may differ on your version. [c1]
Crop a Video in Photos
Cropping changes the visible framing of a video. Use it when you want to remove something near an edge or change the frame’s proportions—not when you want to shorten the recording.
- Open Photos and select the video you want to edit.
- Tap Edit to open the editing controls.
- Tap Crop/Rotate to enter crop mode.
- Drag the corners of the crop frame to adjust the area you want to keep.
- Tap Done when you are satisfied with the framing. [c1]
The supplied guide places Edit in the upper-right corner, but treat that location as version-specific rather than a requirement. These instructions describe the Photos workflow documented for iOS 13 or later, not every iPhone interface. [c1]
Choose the Crop and Check the Framing
For a freeform crop, adjust the corners manually. For a specific frame shape, use the aspect ratio icon in crop mode rather than estimating the proportions by eye. The supplied guide documents both options. [c1]
Before saving, decide what must remain visible. A tighter crop may remove a distracting edge but also cut off a hand, a face, or text elsewhere in the recording. Review the whole clip after saving, especially if the subject moves.
The references support the cropping controls, but they do not establish a guaranteed export resolution or unchanged image quality for every video. Avoid treating a successful crop as proof of a lossless result.
Crop Review Checklist
- Identify the subject or detail that must remain visible.
- Choose manual framing or a preset aspect ratio.
- Keep necessary text and important action inside the frame.
- Save the crop, then play the entire video.
- Reopen the edit if the framing cuts off something important.
Crop the Frame or Trim the Length?
Crop when the problem is what appears around the edges of the picture. Trim when the problem is unwanted time at the beginning or end. The crop workflow uses Crop/Rotate; the trim workflow uses the video timeline’s end sliders. [c1] [c2]
To shorten a video instead:
- Open the video in Photos and tap Edit.
- Move the sliders at either end of the timeline to set the start and stop times.
- Tap Play to preview the shortened clip.
- Tap Done, then choose Save Video or Save Video as New Clip. [c2]
Apple explains that Save Video saves the trimmed version, while Save Video as New Clip retains the original and adds a separate trimmed version. Those choices are documented for trimming; they should not be assumed to appear in the same way when saving a crop. [c2]
Undo a Crop You Do Not Want
To return a cropped video to its original settings, open it again, tap Edit, then tap Revert, as described in the supplied cropping guide. Use this when you want to discard the saved changes rather than merely adjust the crop. [c1]
Do not confuse this with restoring time removed from a separately saved trimmed clip. Apple states that Revert to Original cannot restore the original length of a video created with Save Video as New Clip; the original remains a separate library item. [c2]
FAQ
Do I Need Another App to Crop a Video on iPhone?
Not for the basic workflow described here. The supplied guide documents manual cropping and aspect ratio selection in the built-in Photos app on iOS 13 or later. [c1]
Will Cropping Make My Video Shorter?
Cropping changes the frame, not the start and stop times. To shorten the recording, use the timeline sliders in Photos to trim it. [c1] [c2]
What If I Only Want to Rotate the Video?
Open the video in Photos, tap Edit, and enter Crop/Rotate. The supplied guide describes a rotate control for 90-degree turns. Use rotation rather than tightening the crop when orientation is the issue, then tap Done. [c1]