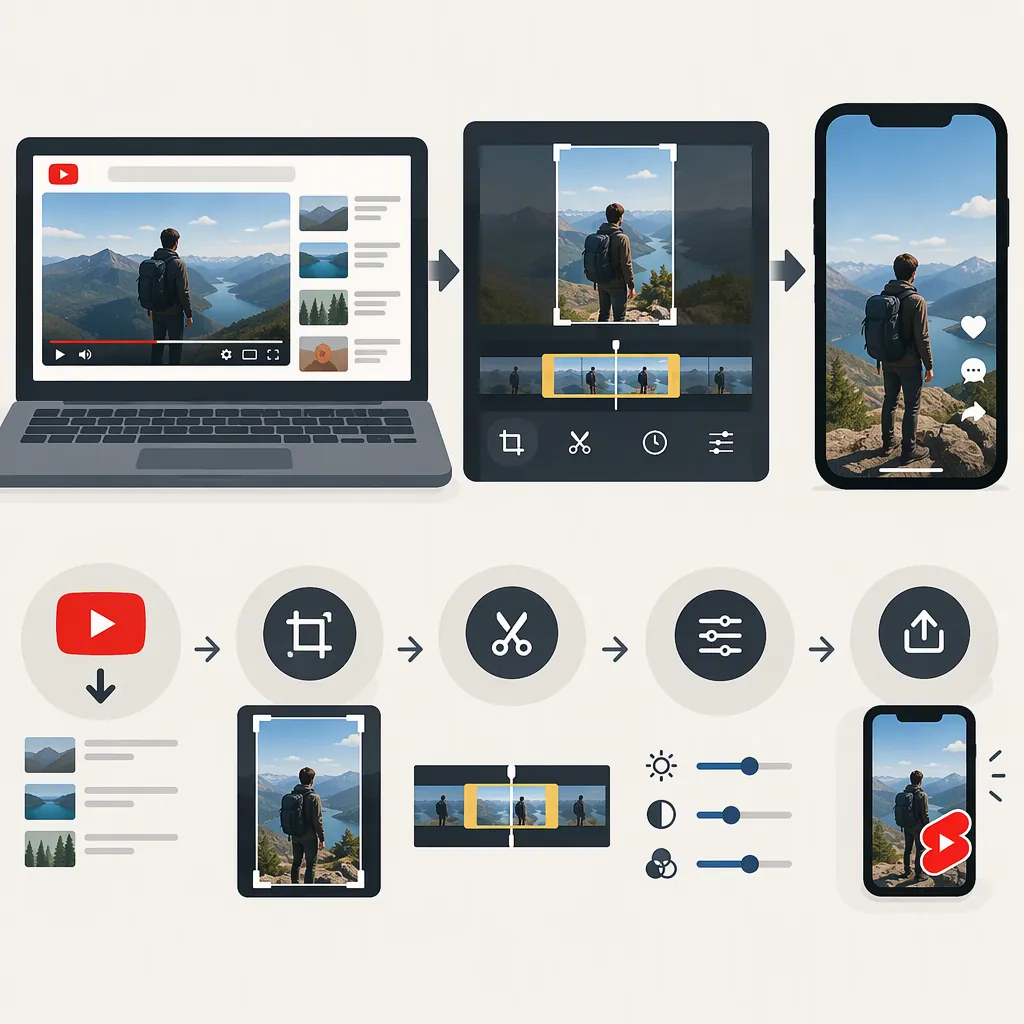
How to Make Shorts from YouTube Videos
To make Shorts from YouTube videos, select a self-contained moment from footage you are authorized to reuse, trim it to one complete idea, reframe the visuals, and check captions and audio. Then export if you are using a separate editor, inspect the finished file, and upload it using YouTube’s current requirements.
You can work through an available in-app editing option or edit an authorized source file separately. The workflow below covers both routes.
Platform details: Social Media Examiner’s September 13, 2022 walkthrough documents an in-app editing route, but it does not establish current YouTube menu labels, eligibility rules, or duration limits. Use it as historical context—not current specifications. Before editing, check YouTube’s current Shorts creation and upload guidance through its Help resources, along with the options shown in your account. [sme-shorts]
1. Choose Your Source and Editing Route
Start with your original recording or footage you have permission to edit and publish. A video being publicly available is not the same as permission to reuse it. Review any music, guest appearances, graphics, or third-party footage included in the intended excerpt.
Choose the route that fits your available footage and controls:
| Route | Starting point | What to check |
|---|---|---|
| In-app editing | Your own published YouTube video | Whether your account and video have an available Shorts editing option, and what limits that option applies |
| Separate editing | An authorized source file | Whether your editor can prepare the intended composition and export a file that meets current YouTube upload requirements |
In-App Editing
Open your own published video in the YouTube app and inspect the available creation options. The 2022 walkthrough described Create > Edit Into a Short; treat that path as historical rather than a guaranteed current sequence. [sme-shorts]
If an appropriate option is available, inspect its selection, trimming, preview, and publishing controls before proceeding. If it is missing or does not offer the control you need, use an authorized source file in a separate editor instead.
Separate Editing
Use this sequence to move from source footage to an upload-ready file:
- Import the source file into your editor.
- Set up the target canvas after checking current YouTube Shorts format requirements.
- Select the excerpt using start and end timestamps.
- Trim and reframe while preserving the speaker’s meaning.
- Review captions, overlays, and audio.
- Preview the complete project before exporting.
- Export using settings that meet the verified upload requirements.
- Open and watch the exported file, then upload it to YouTube.
The project preview and the exported-file review are separate checks. Review both rather than assuming the final file matches what you saw in the editor.
2. Find a Moment That Stands on Its Own
Review the long video for a complete answer, useful demonstration, clear explanation, or concise exchange. Select a passage that viewers can understand without watching the preceding discussion.
For each candidate, ask:
- What single question does this excerpt answer?
- Does the opening identify the subject?
- Does the ending deliver the answer or finish the demonstration?
- Does removing surrounding material change the speaker’s meaning?
Avoid opening with an unexplained phrase such as “that’s why it works.” Move the start earlier if viewers need a definition or setup. Keep qualifications that materially change the advice, even when doing so makes the excerpt longer.
Social Media Examiner suggests helpful tips, updates, and evergreen material as possible uses for repurposed Shorts. These are editorial options, not promises of audience growth. [sme-shorts]
Hypothetical Selection Example
Suppose a long tutorial contains this passage:
- 04:10: “Next, here’s how to keep a small camera steady on a desk.”
- 04:16: “Use a tabletop tripod, tighten the mount, and check that the legs are fully spread.”
- 04:29: “This setup is for a lightweight camera; check the tripod’s load rating before using heavier equipment.”
- 04:39: The demonstration finishes.
- 04:42: The speaker moves to another topic.
A candidate excerpt would run from 04:10 to 04:39:
- The opening names the problem.
- The middle shows the steps.
- The load-rating qualification remains intact.
- The ending completes the demonstration without including the next topic.
Starting at 04:16 would remove useful setup. Ending before the qualification would make the advice appear broader than the speaker intended.
Clip Selection Worksheet
Copy this worksheet for each candidate:
- Source video:
- Permission or ownership check:
- Start timestamp:
- End timestamp:
- One question answered:
- Context needed at the opening:
- Essential qualification to preserve:
- Closing answer or payoff:
- Reason to keep or reject the clip:
3. Trim and Reframe Without Losing Meaning
Make a first cut that preserves the full idea. Then remove irrelevant introductions, repeated statements, and pauses that do not contribute to understanding. Do not join distant statements in a way that creates a claim the speaker did not make.
Use this editing order:
- Establish the beginning and ending.
- Compare the excerpt with the surrounding source material.
- Remove unnecessary material without losing context.
- Adjust framing at speaker changes or demonstrations.
- Add only the text needed to orient viewers.
- Replay the entire cut before styling it further.
For a vertical composition, inspect framing throughout the excerpt—not just at its first frame. Keep the active speaker, demonstrated object, or relevant screen area visible.
If a close crop hides essential information, use a wider composition within the canvas or a separate view of the demonstration. For screen recordings, check that the relevant controls and text remain readable at phone size.
The historical in-app walkthrough describes segment trimming and timed text overlays. Use whichever equivalent controls are available in your chosen editing route. [sme-shorts]
4. Check Captions, Audio, and On-Screen Text
If you add captions, compare them with the audio rather than accepting a generated transcript without review. Pay particular attention to:
- Names and technical terms.
- Numbers, measurements, and units.
- Words that reverse meaning, such as “not.”
- Caption timing around cuts.
Keep captions distinct from editorial overlays. Captions should represent the spoken content; an overlay can supply a brief topic label or explain an abbreviation. Do not use an overlay to make the statement stronger than the source supports.
Preview at phone size. Check whether text covers faces, demonstrations, or other essential details.
Listen through the entire cut for clipped words, abrupt loudness changes, and background sound that obscures speech. If a sentence becomes difficult to follow after trimming, revise the cut before trying to disguise it with effects.
5. Export, Upload, and Verify the Result
Review the finished edit as a standalone video. Its title and opening should accurately describe what the excerpt delivers—not a broader promise that only the full video fulfills.
Verify the Requirements for Your Route
Before exporting or completing an in-app edit, check these items in current YouTube guidance and your account’s creation or upload interface:
- Shorts format: Accepted aspect ratios and dimensions.
- Duration: The applicable maximum for the intended upload, plus any separate limit imposed by an in-app editing tool.
- File requirements: Supported file types and relevant export guidance if uploading from a separate editor.
- Feature availability: Whether the in-app option is available for your account and selected source video.
- Publication settings: The available visibility, audience, and scheduling choices.
Keep general upload requirements separate from in-app feature limits. An editing option’s restrictions should not be assumed to describe every way of uploading a Short.
Inspect the Exported File
If you edited separately, export the excerpt and open the resulting file outside the editor. Check:
- The correct start and end points.
- The complete composition, including speaker changes.
- Caption accuracy, timing, and visibility.
- Audio continuity.
- Any missing media, unexpected blank frames, or unintended overlays.
If you find a problem, fix the project and export again.
Upload and Review
Open the current YouTube upload or Shorts creation interface for your account. Select the checked file, or continue from the in-app editor, and follow the displayed instructions. Review the title, visibility, and audience settings before completing publication. The 2022 walkthrough also describes reviewing visibility and audience settings at this stage. [sme-shorts]
Where the current interface permits, keep the upload non-public while checking the processed result. Confirm that it is treated as the intended Short before making it public.
Do not confuse a shareable YouTube Clip with a separately published Short. Social Media Examiner’s walkthrough distinguishes Clips that reference a segment of the original video from Shorts published as their own videos. Verify current behavior if you are using a Clip-related option. [sme-shorts]
Pre-Publish Checklist
- Confirm authorization to reuse the footage and included media.
- Watch the excerpt without the surrounding long video.
- Verify that the edit preserves the speaker’s meaning.
- Check framing throughout the clip.
- Correct captions and verify overlays.
- Listen for cut-off words and unclear audio.
- Confirm current format, duration, and upload requirements.
- Inspect the exported file if using a separate editor.
- Review the title, visibility, and audience settings.
- Check the uploaded result before making it public, where available.
FAQ
Can I Make a Short from a Video Already on My Channel?
Check your YouTube app for an available Shorts editing option on that video. Social Media Examiner’s 2022 walkthrough documented Create > Edit Into a Short for a channel’s own published videos, but that historical path does not confirm current availability. If the option is unavailable, edit an authorized source file separately. [sme-shorts]
How Long Should the Excerpt Be?
Use enough footage to deliver one complete idea without unnecessary setup. Preserve essential qualifications, and verify the current maximum duration for your upload route. Do not use the walkthrough’s 2022 duration limits as present-day specifications. [sme-shorts]
What If I Cannot Find an In-App Editing Option?
Use an authorized source file in a separate editor. Import it, set up the target canvas, select and trim the passage, adjust framing, and review captions and audio. Export according to current YouTube requirements, inspect the exported file, and then upload it.
How Do I Choose Multiple Shorts from One Long Video?
Treat each excerpt as a separate editorial decision. Give each one a distinct question, enough context, and a complete ending. Compare every excerpt with the original discussion to ensure shortening it has not changed its meaning. Do not force a clip count if the source offers only one suitable moment.
Is a YouTube Clip the Same as a Short?
Do not treat them as interchangeable. The cited walkthrough describes Clips as references to segments of an original video and Shorts as separately published videos. Check the current interface to confirm which output you are creating. [sme-shorts]