How to Make Gaming Clips for TikTok
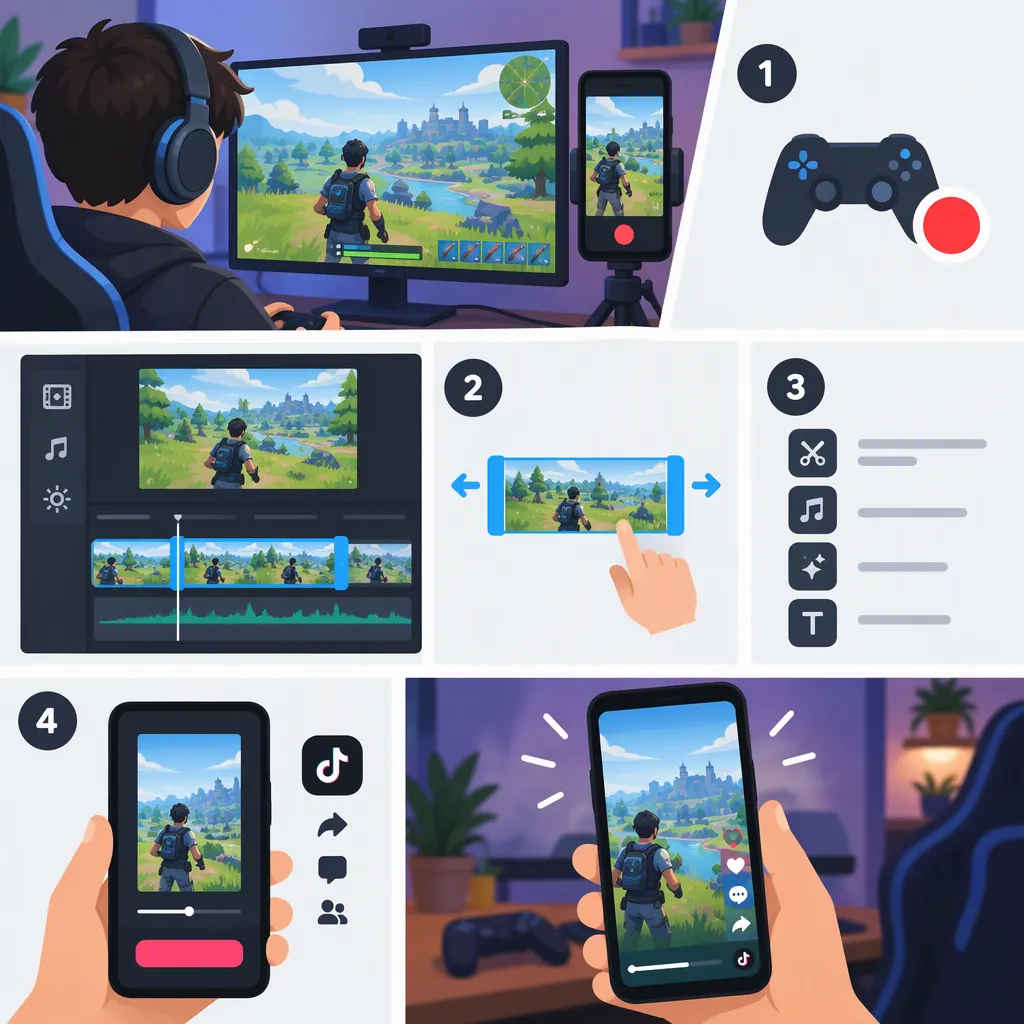
Choose one moment from your own gameplay, trim it to a clear setup and payoff, and arrange the footage on a vertical 9:16 canvas. Add readable captions where needed, balance the audio, then export and preview the finished clip before uploading. This workflow follows the reference’s basic editing steps; it does not require endorsing a particular editor. [source_1]
Choose One Moment with a Clear Payoff
Start with gameplay you recorded yourself. As a precaution, check permission before including someone else’s footage, voice, music, or artwork.
Choose a moment you can describe in one sentence: a last-second escape, a failed strategy, an unexpected encounter, or a reaction to a difficult win. The reference recommends trimming around exciting or funny gaming moments. [source_1]
For your first edit, use a simple selection test:
- Setup: What does the viewer need to understand before the action?
- Turning point: Where does the situation change?
- Payoff: What makes this moment worth showing?
If the payoff needs a long explanation, try a different moment or add a short context line. Treat this as an editorial choice, not a formula for views.
Clip Selection Worksheet
Source recording: ______
Moment in one sentence: ______
Setup begins at: ______
Turning point occurs at: ______
Payoff ends at: ______
Context the viewer needs: ______
Permission or privacy concerns to resolve: ______
Trim the Clip into a Complete Mini-Story
Import the recording into your editor and mark the payoff first. Work backward until you have enough setup to understand it, then choose an ending that includes the result or reaction. Importing footage and trimming it on a timeline are part of the reference’s editing workflow. [source_1]
Use this suggested editing order:
- Remove unrelated waiting, loading, and menu navigation.
- Keep any movement or dialogue needed to explain the action.
- Cut repeated information rather than removing all pauses automatically.
- End after the payoff has had room to register.
- Watch the cut without the surrounding recording. Add back context if the result feels confusing.
Make the opening specific. For example, a context line such as “One health point left” can frame an escape—provided it accurately describes your footage. Avoid inventing stakes or presenting a staged moment as an unplanned event.
Suggested Timeline Plan
Opening: Show the situation and add one accurate context line if needed.
Middle: Keep the action that leads directly to the outcome.
Payoff: Show the win, failure, surprise, or reaction.
Ending: Remove footage that begins a different story.
Review: Check whether each remaining shot contributes context, action, or payoff.
Reframe Gameplay for a Vertical Canvas
Set up a 9:16 vertical canvas. The reference describes adjusting the aspect ratio, zooming, and repositioning footage for this format, and discusses gameplay-focused and split-screen layouts. [source_1]
Choose the arrangement based on what the viewer needs to see:
- Gameplay-first crop: Try this when the important action stays within a narrow part of the frame.
- Gameplay and facecam split: Try this when your reaction contributes to the story. Give the gameplay enough space to remain understandable.
- Full-frame gameplay within the canvas: Consider this when cropping would remove essential information. Use a simple background rather than stretching the image.
Scrub through the entire clip after reframing. Check the target, player movement, score, health indicators, and any text needed to understand the outcome. Adjust the crop when the action moves rather than assuming one position works throughout.
Preview the draft in the upload interface when possible. Keep essential information away from any controls or overlays you can see in that preview; their exact placement is not verified by the provided reference.
Vertical Framing Check
Canvas is set to 9:16: □
Main action remains visible throughout: □
Important game information is readable: □
Facecam is included only if it adds context or reaction: □
Footage is not stretched: □
Text does not cover the target or payoff: □
Upload preview has been checked for visible overlays: □
Add Captions and Keep Audio Purposeful
The reference includes captions, text, music, and sound effects in its editing workflow. [source_1] Use them selectively rather than adding every available effect.
For captions, transcribe the dialogue that matters to the moment. Check game names, player names, slang, and any automatically generated words against the recording. Keep added commentary distinct from spoken dialogue so viewers can tell which is which.
For audio, try this review sequence:
- Listen to the clip without music. Decide whether the voice and game sounds already tell the story.
- Adjust levels so important dialogue is understandable.
- If you add music, use audio you have permission to use and check the applicable usage terms.
- Remove effects that distract from the action or disguise what happened.
- Play the clip with sound off, then with sound on. Check that text supplies necessary context without replacing important visual information.
Do not assume that a song being popular means you have permission to include it in an exported video.
Caption and Audio Review
Spoken words checked against the recording: □
Game-specific terms corrected: □
Added commentary is clearly distinguishable from dialogue: □
Captions do not cover essential gameplay: □
Important speech is understandable: □
Music and other added audio have been checked for permission: □
Clip reviewed both muted and with sound: □
Export, Preview, and Check the Finished Clip
Exporting the edited video and uploading it to TikTok are the final steps in the reference’s workflow. [source_1] Before publishing, review the exported file—not just the editor’s preview.
Check for clipped captions, missing audio, accidental blank frames, and crops that lose the action. Watch on the phone you expect to use for uploading, if available. Also inspect the recording for private messages, account details, or other information you did not intend to share.
Write an accurate post description that identifies the game or situation without overstating the result. Keep the source recording and editable project so you can correct a mistake without starting again.
Evidence limits: The supplied reference is a vendor-authored comparison article with promotional claims. This guide uses its basic editing steps, not its product superiority or growth claims. The reference does not verify current TikTok upload limits, music permissions, interface overlays, or an ideal clip length. Check those details in the relevant current interface or terms rather than treating this workflow as a platform specification.
Final Export Checklist
Exported file opens and plays correctly: □
Setup and payoff are understandable: □
Crop preserves the important action: □
Captions are accurate and readable: □
Audio is present and balanced: □
Private information has been removed: □
Post description accurately describes the clip: □
Current upload requirements have been checked: □
Source recording and project are saved: □
FAQ
How Long Should a Gaming Clip Be?
Use enough footage to establish the situation and show the payoff, then remove unrelated material. The reference recommends trimming unnecessary footage but does not establish an ideal duration. Treat length as an editing decision, and check current upload limits separately. [source_1]
Do I Need a Facecam for Gaming Clips?
No facecam is necessary for this workflow. Choose a gameplay-only layout when the action tells the story, or include a facecam when the reaction adds something useful. The reference presents gameplay-focused and split-screen reaction layouts as alternatives. [source_1]
Which Editing Tools Do I Need?
Look for an editor that lets you import footage, trim on a timeline, arrange a vertical canvas, add text, adjust audio, and export. These functions cover the basic workflow described in the reference. This guide does not verify current product availability, pricing, or comparative performance. [source_1]