How to Make a TikTok Video Where You Change Clothes
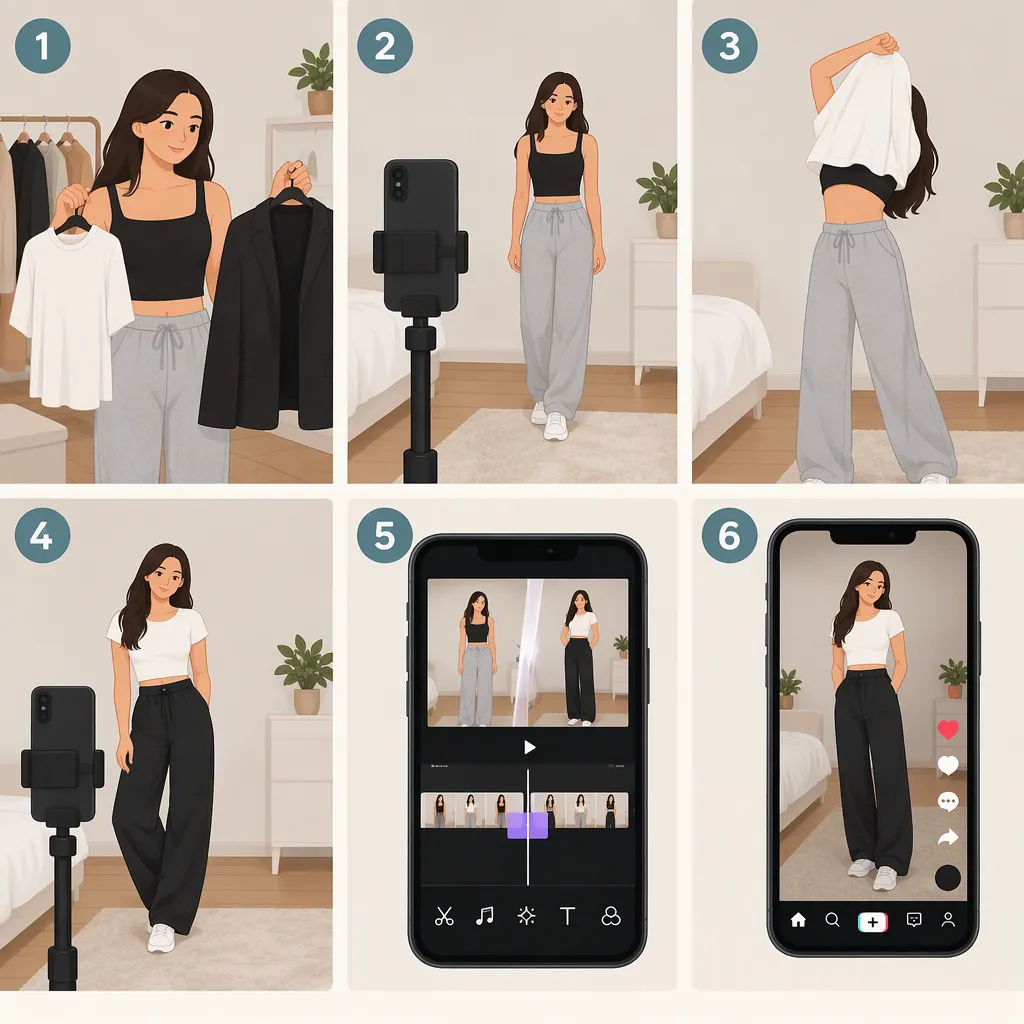
Film two clips with the camera, background, and your position unchanged. In the first, pull your shirt forward. Change into your second outfit off-camera, then hold the first shirt over it in the same position and pull it away to reveal the new look. Join the clips where the shirt and your pose match. The supplied filming guide describes this two-clip setup; the editing steps below are suggested practice, not verified TikTok menu instructions. [src-1]
Plan the Outfit Change
Start with one change between two outfits rather than a long sequence. Choose clothes that look noticeably different, and frame the shot so the change is visible.
The supplied guide recommends two contrasting shirts, the same background, and a remembered standing position. Its central filming principle is to keep the scene unchanged while the clothing changes. [src-1]
For this practice version, keep the camera stationary and mark where your feet go. Set out the second outfit before recording. Choose a reveal gesture you can repeat comfortably, such as pulling the first shirt forward and then removing it from view.
You do not need to record yourself getting changed. Stop filming between takes and change privately.
Two-Clip Shot Plan
- Clip A: Wear outfit one, face the camera, and pull the shirt forward.
- Between clips: Stop recording, change into outfit two, and leave the camera in place.
- Clip B: Hold the first shirt over outfit two, match the previous pose, and pull the shirt aside.
- Edit: Join the matching positions, then keep enough of the reveal to show the new outfit.
Film Two Matching Clips
- Record the first outfit. Stand at your mark and begin with a brief still pose. Pull the edge of your shirt toward the camera, then pause with it extended.
- Keep the setup in place. Stop recording without repositioning the camera. Change into your second outfit.
- Recreate the ending pose. Hold the removed shirt over the new outfit. Match your hands, shoulders, and the shirt's position as closely as you can.
- Record the reveal. Pull the old shirt toward the camera or move it to the side so the second outfit becomes visible. This held-shirt reveal follows the method described in the supplied guide. [src-1]
- Capture alternatives. As a practical safeguard, record another take with a slightly slower gesture so you have more possible cut points.
Before editing, compare the last part of the first clip with the beginning of the second. Look for differences in your stance, shirt height, framing, and background.
Edit the Clothes-Change Transition
Use an editor that lets you arrange and trim two clips. The following is a suggested workflow; the references do not establish current TikTok editing controls or menu names.
- Place the clips in order. Put outfit one before outfit two.
- Find the matching pose. Scrub through the end of clip A and the beginning of clip B. Choose frames where the shirt, hands, and body position look closest.
- Trim the excess. Remove the pause after the chosen frame in clip A and the setup before the matching frame in clip B.
- Try a direct cut first. Join the clips without adding a decorative transition. Judge whether the movement reads as one continuous gesture.
- Adjust one frame at a time if possible. If the action repeats, shorten one side. If it skips too far forward, restore a little footage.
- Add sound after checking the picture. If you want a beat-timed reveal, align the cut with your chosen musical accent. Use audio you are permitted to include.
The source describes combining the recorded clips into one video, but it does not provide frame-by-frame trimming instructions. These steps are an original practice workflow built around its filming setup. [src-1]
Transition Review Checklist
- Watch once without sound: does the gesture look continuous?
- Pause at the cut: do the hands and shirt line up?
- Check the background: did the camera move?
- Check the reveal: is the second outfit clearly visible?
- Watch with sound: does the cut land where you intended?
Fix Mismatches and Make It Your Own
Use these checks to decide what to revise:
- Your body jumps sideways: Compare your foot position and shoulder angle. Reshoot the second take if trimming cannot produce a close match.
- The background shifts: Check whether the camera moved between recordings. Return to a stationary setup.
- The shirt changes position abruptly: Try a different cut point or repeat the second take with the shirt held closer to its first position.
- The motion stops and restarts: Trim out the pause around the join.
- The new outfit is hard to see: Leave a short, unobstructed reveal after moving the old shirt aside.
For an original version, choose your own outfit contrast, setting, gesture, and ending pose. Change one element at a time while practicing so you can identify what needs adjustment.
Evidence limit: The supplied instructional page is a commercial app page. This article uses its public filming description, not its quality claims, processing promises, or testimonials. It does not verify any app's current features. [src-1]
FAQ
Do I Need a Special Clothes-Change Effect?
For the practice method here, use two staged clips and a direct cut rather than relying on a named effect. The supplied guide describes creating the clothing reveal physically during filming and then combining the clips. It does not establish which tools are currently available inside TikTok. [src-1]
Should the Camera Stay Still Between Outfits?
Keep it still for this beginner setup. The supplied guide recommends the same background and an unchanged scene across the clothing change. Moving-camera variations can be left for a later experiment. [src-1]
How Can I Include More than Two Outfits?
As a practice extension, repeat the two-clip pattern for each additional outfit. Plan the ending gesture of one shot to match the opening gesture of the next, and review each join separately before assembling the full sequence.