How to Choose and Set up Lighting for Video
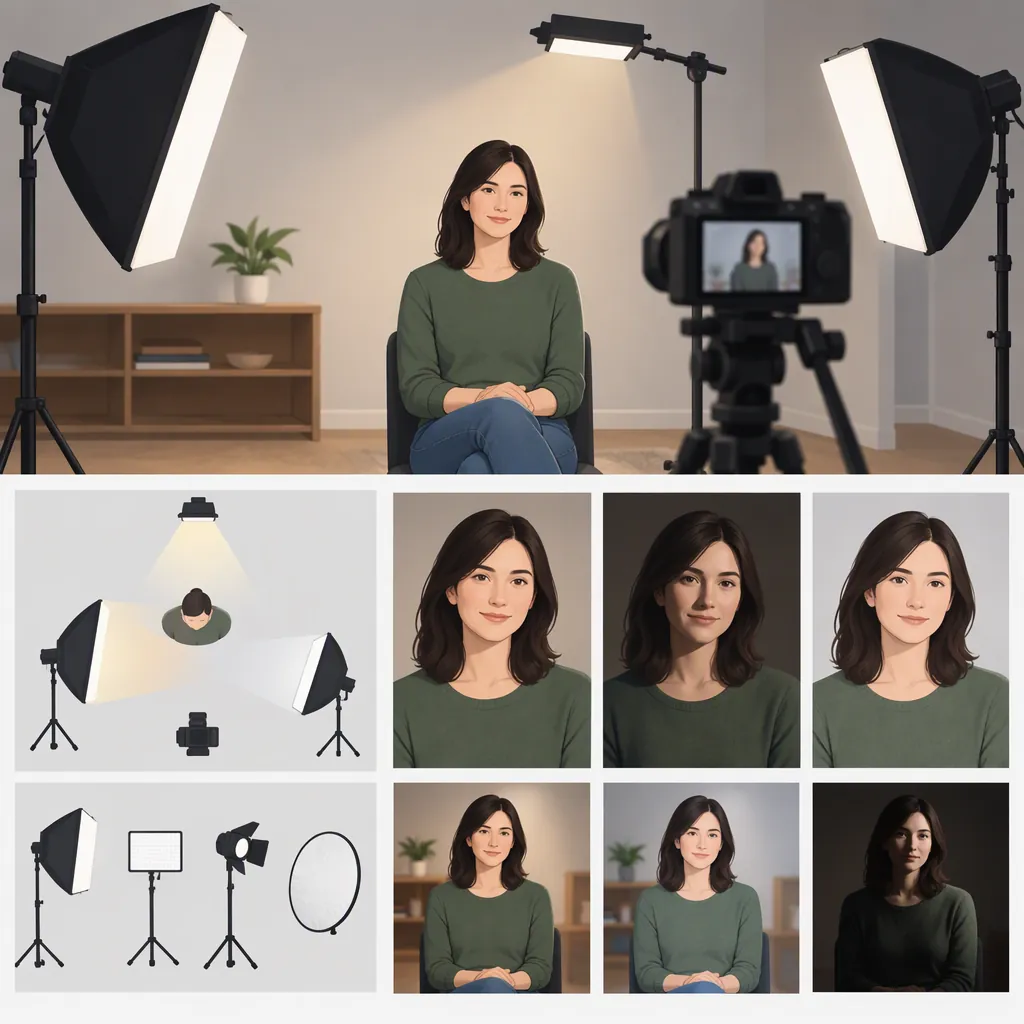
For a simple talking-head video, start with a soft main light facing you or slightly to one side. Use a window or a dedicated light as the key light, then add a reflector or weaker fill light if the shadows are too strong. Add a backlight only when you want more separation from the background. Two-point lighting is a useful starting setup; three-point lighting adds a backlight rather than replacing the key and fill. [lighting_guide]
Choose a Setup for Your Shot
Choose lighting by the shot you need, not by the number of lights available. The reference guide describes window lighting, ring lights, and two-, three-, and four-point arrangements. These are options, not a requirement to use every light. [lighting_guide]
| Setup | Useful Starting Point | Main Limitation |
|---|---|---|
| Window light | A stationary presenter near a bright window | Daylight changes, so consistency needs checking. |
| Ring light | A presenter facing the camera who wants relatively even facial lighting | A single frontal source offers fewer separately adjustable lighting roles. |
| Key and fill | A talking-head shot with adjustable facial shadows | Background separation may need another light. |
| Key, fill, and backlight | A presenter who needs a more distinct outline against the background | The additional light adds another placement decision. |
| Background light added | A background that needs separate illumination | It is optional if the existing background already looks suitable. |
Treat these as starting arrangements. A shadowed, dramatic look and an evenly lit instructional shot can call for different choices.
Build a Key-And-Fill Setup
Use this sequence as a practical starting point, then judge the result through the camera:
- Set the frame first. Position the camera and presenter before placing lights. Leave some space between the presenter and background where the room permits.
- Place the key light. Put the main light to one side of the camera, slightly above the presenter's eye line, aimed toward the face.
- Inspect the shadows. Look at the unlit side of the face before adding anything else.
- Add fill if needed. Place a weaker light on the opposite side, or use a reflector to return light toward the shadowed side.
- Adjust the balance. Keep the key as the main source. The guide suggests fill around half the key's brightness, but use that only as a starting point rather than a fixed rule. [lighting_guide]
- Add separation only if needed. A backlight placed behind the presenter and aimed toward them can create highlights along the hair and body outline. A background light serves a different purpose: illuminating the wall or backdrop. [lighting_guide]
Change one element at a time so you can compare its effect. Do not assume equal brightness on both sides is necessary for every style.
Work with Window and Outdoor Light
For an indoor window setup, position yourself so the window lights your face rather than sitting directly behind you. If the light is strongly directional, try a reflector on the darker side. A curtain can diffuse window light when the sunlight is harsh. [lighting_guide]
Record a test, then check again during the session. The sun's movement can change the lighting between takes, so window light is not automatically the most consistent choice for a long recording. [lighting_guide]
Outdoors, the reference guide describes diffusion and reflectors as ways to manage sunlight. Cloud cover can soften shadows, while direct midday sun can produce strong shadows and highlights. Light around sunrise or sunset can be softer, but the available recording window is limited. Do not rely on a universal clock time; assess the actual conditions at the location. [lighting_guide]
Fix Common Lighting Problems
| What You See | Adjustment to Try |
|---|---|
| Hard-edged facial shadows | Try diffusion or bounce the light off a wall or reflector. |
| One side of the face is too dark | Add fill or reposition the reflector. |
| Presenter blends into the background | Test a backlight and reassess the outline. |
| Noticeably different color casts | Simplify the sources and avoid mixing different color temperatures. |
| Glare on a whiteboard | Reposition the lights and check the reflection through the camera. |
The guide distinguishes hard and soft light by shadow edges: hard light produces distinct edges, while soft light produces more gradual transitions. Dimming changes output, so assess shadow softness separately rather than treating lower brightness as the whole solution. [lighting_guide]
For artificial lights, use diffusion accessories intended for the fixture and follow its operating instructions. This workflow does not recommend attaching improvised paper or fabric to lamps.
There is no single placement that guarantees the same result in every room. Use a short test recording to decide whether the adjustment actually improves your shot.
Test and Document the Setup
Before a full take, make a brief recording with the presenter in the intended position. Review the face, background, reflections, and any planned movement. The reference guide recommends checking framing, background distractions, equipment, and audio before recording. [lighting_guide]
Use the checklist below as a repeatable review tool. It is a suggested workflow, not a measured performance standard.
Evidence limitation: This article draws on one general lighting guide. It does not establish comparative product performance, current prices, or a universally best lighting arrangement. Placement and brightness still need testing in your own shot.
Pre-Recording Lighting Checklist
- [ ] Camera framing and presenter position are set.
- [ ] The key light makes the face clearly visible.
- [ ] Facial shadows match the intended look.
- [ ] Fill is added only where needed.
- [ ] Any backlight or background light has a clear purpose.
- [ ] Color differences between light sources are acceptable.
- [ ] Reflective surfaces have been checked through the camera.
- [ ] A short test clip has been reviewed.
- [ ] Daylight has been rechecked before the next take.
- [ ] Light positions and settings have been noted for later recording.
FAQ
How Many Lights Do I Need for Video?
There is no universal minimum. Window light can provide the main illumination, while a key-and-fill arrangement offers control over facial shadows. A backlight and background light are optional additions for separation and background illumination. [lighting_guide]
Should I Use a Ring Light or Three-Point Lighting?
A ring light is a simple option for relatively even lighting when facing the camera. Three-point lighting gives the key, fill, and backlight separate roles. Choose according to the shadow balance and background separation you want, rather than assuming either arrangement is always better. [lighting_guide]
How Can I Make Video Lighting Softer?
Try appropriate diffusion or bounce the light off a wall or reflector, then inspect the shadow edges in a test recording. Softer light produces more gradual shadow transitions. Use accessories suitable for the fixture rather than attaching improvised materials to a lamp. [lighting_guide]
Sources
- [lighting_guide] Lighting for Video Recording: How to Choose the Best Lighting Setup