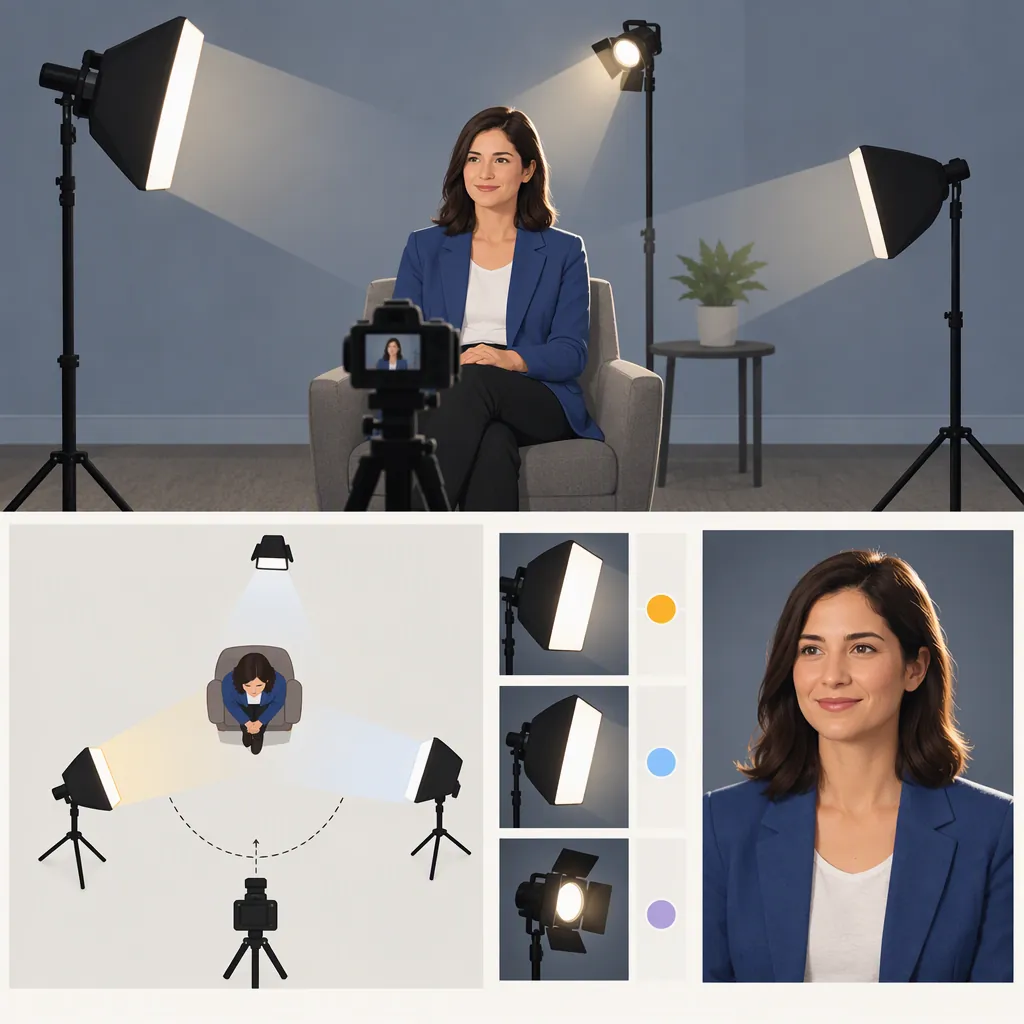
How to Set up 3-Point Lighting for an Interview
For a three-point lighting interview setup, place a soft key light roughly 30–45 degrees to one side of the camera and slightly above the subject’s eyes. Add a less intense fill on the opposite side to soften shadows, then position a backlight behind and above the subject for separation. Adjust each light while viewing the camera image; these positions are starting points, not fixed rules. [c1] [c2]
Understand the Three Lighting Roles
Three-point lighting separates three jobs so you can adjust them independently: illuminating the face, controlling shadows, and distinguishing the subject from the background. [c2]
| Role | Purpose | Starting Position |
|---|---|---|
| Key | Establishes the main light direction and facial shape | In front, off to one side of the camera |
| Fill | Opens the shadow side without removing all contrast | Opposite the key, with less intensity |
| Backlight | Adds an edge highlight to hair or shoulders | Behind and above the subject |
These are lighting functions, not always three required fixtures. A window can provide the key, a reflector can provide fill, and background contrast can provide separation without a backlight. [c1]
Choose the Background and Build the Key
Choose the background before placing lights. Where space allows, move the subject away from the wall; this gives you more control over background lighting, exposure, and focus. Examine existing windows, lamps, and reflected light before deciding what to add. [c1]
Start with a large, soft key approximately 30–45 degrees to one side of the camera and slightly above eye level. Watch the face rather than trying to reproduce an exact angle. Moving the key closer to the camera axis makes the lighting more frontal; moving it farther to the side creates stronger modeling. Changing its height changes the eye, nose, and chin shadows. [c1]
Softness depends primarily on the apparent size of the source relative to the subject. A broad modifier placed relatively close can produce soft light while retaining direction. Soft light does not have to mean an evenly lit, flat-looking face. [c1]
Adjust Fill and Background Separation
With the key established, inspect the shadow side of the face. If it is too dark for the intended look, add a lower-intensity fill from the opposite side or bounce light with a reflector. More fill reduces contrast; less fill preserves deeper shadows. Avoid treating equal brightness on both sides as the default goal. [c2]
If pale walls or furniture already bounce too much light onto the face, adding another light may not help. Negative fill—a black flag or fabric on the shadow side—reduces that bounce and restores definition. [c1]
Next, assess whether the subject blends into the background. If needed, place a backlight behind and above the subject, aimed toward the hair and shoulders, with the fixture outside the frame. A backlight lights the subject’s edge; a background light illuminates the space behind them. They serve different purposes. [c2]
Separation does not always require an edge highlight. Differences in brightness or color, subject-to-background distance, depth of field, and composition can also distinguish the subject. Add a backlight only when it improves the image. [c1]
Adapt the Setup to the Location
For a recorded interview, use lighting that remains on throughout the take rather than photographic flash. Continuous lighting also lets you see the effect of adjustments before recording. [c2]
There is no universal distance between lights or single color-temperature setting for every interview. Placement depends on the subject, available space, and desired look. When window light dominates, the key can be brought closer to that white point; warmer background lamps can remain warm if the contrast is intentional. Matching Kelvin settings alone does not guarantee identical color rendering between fixtures. [c1] [c2]
These recommendations are practical starting points drawn from the supplied educational guides, not guaranteed settings for every room or face. Neither a rigid diagram nor a fixed brightness balance replaces checking the actual camera image.
Use a Step-By-Step Setup Checklist
Build the arrangement one function at a time: establish the background, shape the face with the key, control the shadows, then evaluate separation. This follows the room-first workflow described in the interview guide and the key-first adjustment sequence in the three-point guide. [c1] [c2]
Interview Lighting Setup Checklist
- [ ] Choose the background and camera framing.
- [ ] Move the subject away from the wall where possible.
- [ ] Identify useful existing light and unwanted bounce.
- [ ] Position the soft key off camera and slightly above eye level.
- [ ] Inspect facial shadows in the camera image.
- [ ] Add fill if shadows need opening, or negative fill if bounce needs reducing.
- [ ] Check whether hair and clothing separate from the background.
- [ ] Add a backlight only if needed; keep its fixture out of frame.
- [ ] Check whether color differences are intentional.
- [ ] Remove any added light that does not improve the image.

Workflow basis: [c1] [c2].
FAQ
Do I Need Three Fixtures for a Three-Point Lighting Interview?
Not necessarily. Three-point lighting describes key, fill, and separation functions. A window, reflector, or existing background contrast may supply some of those functions, although separate fixtures give you more independent control. [c1] [c2]
How Bright Should the Fill Light Be?
Start with the fill less intense than the key, then adjust it while viewing the image. Raise it to open shadows or lower it to preserve contrast. The appropriate balance depends on the intended look rather than one mandatory setting. [c2]
How Can I Adapt Interview Lighting to a Small Room?
Use existing light where it helps, consider a reflector instead of a powered fill, and evaluate whether a backlight is necessary. If pale walls flatten the face with reflected light, negative fill may be more useful than another fixture. [c1] [c2]
Is a Backlight the Same as a Background Light?
No. A backlight aims toward the subject’s hair or shoulders to create an edge highlight. A background light illuminates the space behind the subject and can be added separately when the composition needs it. [c2]