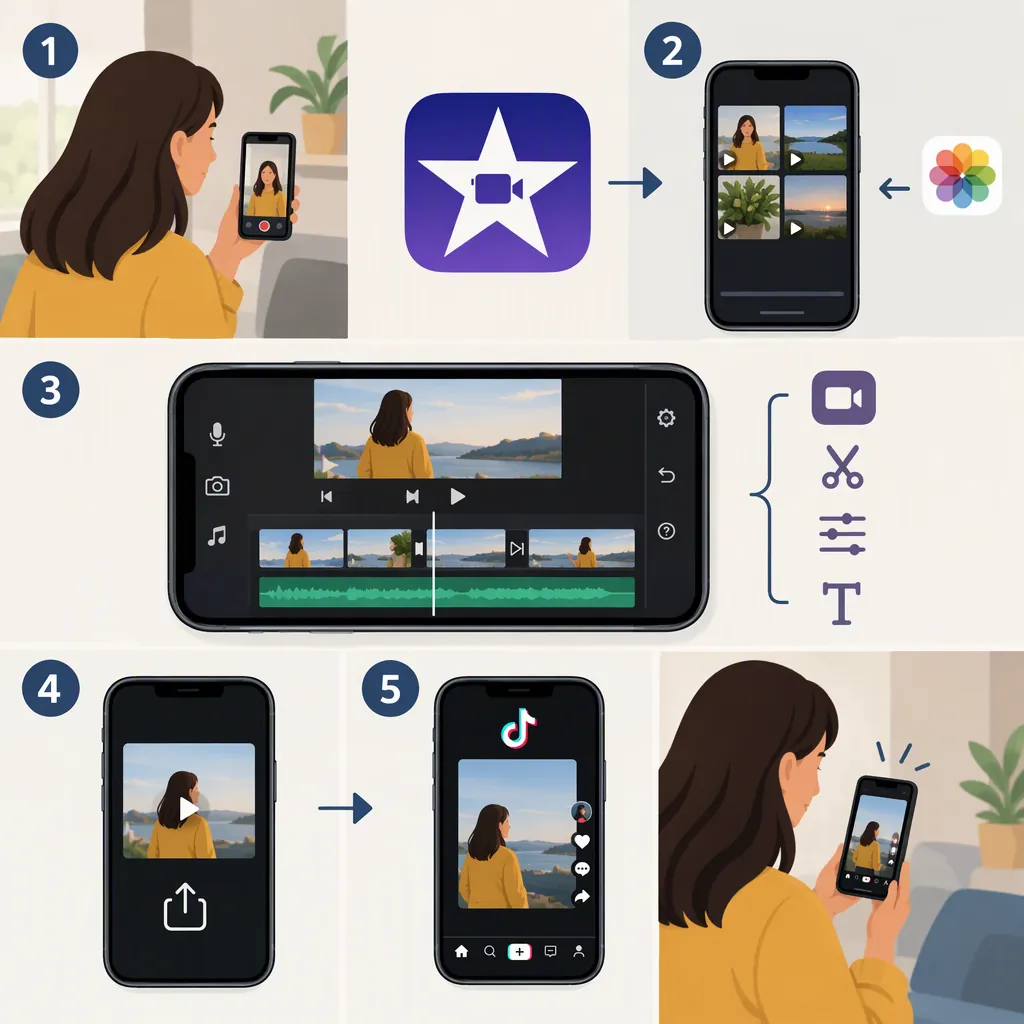
How to Make a TikTok Video with iMovie
To make a video for TikTok with iMovie, create a project, add your footage, trim and arrange clips, add text, balance the audio, and export the finished movie. iMovie supports these editing stages; review the exported file before preparing it for TikTok. [citation-2]
Scope and limits: This is a device-neutral editing workflow, not a button-by-button demonstration of a particular iMovie version. The available references do not verify current portrait-export controls, a method for fixing vertical framing, or TikTok’s upload settings. Those parts are not covered here. If you need an exact vertical-export walkthrough, use instructions that match your device and iMovie version before proceeding.
1. Plan the Video and Its Framing
Choose one idea and gather only the footage needed to explain it. Write a simple three-part outline:
- Opening: Show or state what the video is about.
- Middle: Demonstrate the action or explain the main point.
- Ending: Show the result or finish the explanation.
For example, a short demonstration could show the finished result first, follow with the essential steps, and end with another view of the result. This is an editing suggestion, not a TikTok requirement.
For a portrait presentation, keep the subject and important details comfortably inside the frame. Leave room around them rather than placing essential information at the edges.
Before editing the whole video: Use a representative clip to make a short test project and export it. Inspect its orientation and framing. This checks your intended workflow early; it does not establish that portrait footage will produce a portrait export.
2. Create a Project and Assemble a Rough Cut
Create a new iMovie project and add your selected videos or photos. Apple documents both project creation and adding content, though its overview does not provide device-specific button paths. [citation-2]
Build the first version in this order:
- Add the opening shot.
- Add the demonstration or explanation clips.
- Add the ending.
- Play the sequence from beginning to end.
At this stage, focus on whether the story makes sense. Avoid spending time on titles or music until the footage is in a useful order.
Expected result: A rough cut that communicates the idea, even if it still contains pauses or extra footage.
3. Trim and Rearrange the Clips
iMovie lets you make clips longer or shorter and change their sequence. [citation-2]
Review one clip at a time:
- Find the point where the useful action or explanation begins.
- Shorten the beginning to remove unnecessary setup.
- Find where the useful action or explanation ends.
- Shorten the ending to remove lingering footage.
- Play the transition into the next clip.
Keep enough context for the viewer to understand each action. A tighter edit is not necessarily a clearer edit: if a cut removes an important step, retain more footage or reconsider the sequence.
Then watch the complete rough cut and ask:
- Does the opening establish the subject?
- Are any explanations or shots repeated?
- Does each clip contribute something necessary?
- Does the ending feel deliberate?
Expected result: A clear sequence without unnecessary pauses. Choose its length according to the content; this workflow does not establish a current TikTok duration limit.
4. Add Titles and Balance the Audio
Add Text Where It Helps
Apple documents adding text to video clips and photos, including title sequences and end credits. This does not establish automatic caption generation. [citation-2]
Start with a short title that identifies the topic. Add supporting text only where it clarifies something the footage does not explain on its own.
For each title:
- Use concise wording.
- Avoid covering the subject or an important action.
- Play the section at normal speed to check reading time.
- Recheck the text in the exported file.
Expected result: Text that supports the video rather than competing with it.
Check Speech, Music, and Sound Effects
iMovie includes built-in soundtrack music and sound effects, and Apple documents adjusting audio levels. [citation-2]
Listen to the complete edit. If you include music, adjust the balance so speech remains understandable. Check the beginning and end of each audio section for distracting volume changes.
Before export, confirm that:
- Spoken words are clear.
- Music does not overwhelm the explanation.
- Sound effects serve a purpose.
- You have checked rights and permissions for included media.
The availability of a soundtrack in an editing tool does not, by itself, establish permission for every intended use.
5. Export and Inspect the Actual File
Export your finished movie from iMovie. Apple documents exporting for other devices and sharing on social media, but its overview does not confirm TikTok-specific settings or direct publishing to TikTok. [citation-2]
Open the exported file rather than relying only on the editing preview. Watch it from beginning to end and check orientation, framing, text, sound, and the final frame.
If the Export Looks Wrong
Use the visible problem to decide what needs attention:
| Problem | Next step |
|---|---|
| The image is sideways | Compare the source clip with the exported file to identify where the orientation differs. Pause posting until you have verified a correction method for your device and version. |
| Unwanted black borders surround the image | Check whether the borders appear in the source footage or only in the export. This guide does not establish the controls needed to remove them. |
| The subject or text is cut off | Compare the export with the project preview. Reconsider placement where possible, and verify device-specific framing instructions before exporting again. |
| Text is difficult to read | Shorten the wording or give it more reading time, then export and review again. |
| Speech is hard to hear | Revisit the audio balance, then listen to a new export. |
Portrait correction remains an uncovered step. If orientation, borders, or cropping are unresolved, the video is not ready for posting. “Check the file” is a quality-control step, not a substitute for a verified vertical-export method.
Once the file passes review, prepare it for posting in TikTok and inspect its presentation again before publishing. Exact upload controls are outside this guide’s verified coverage.
Pre-Posting Review Checklist
- The exported file has the intended orientation and framing.
- The opening clearly establishes the subject.
- No unnecessary pauses or repeated shots remain.
- Titles are readable and do not obscure important details.
- Speech is understandable over any music.
- The ending contains no unwanted extra footage.
- Rights and permissions for included media have been checked.
- The video has been reviewed in its intended posting context.
FAQ
Can I Use iMovie on iPhone for a TikTok Edit?
Yes—the iPhone workflow is the subject of Feisworld’s 2021 tutorial on editing TikTok videos with iMovie Mobile. That provides mobile-specific context, but the available article text does not verify current controls or portrait-export behavior. [citation-1]
Which iMovie Settings Should I Use for a Vertical TikTok?
No exact settings are verified by the references used here. Apple confirms that iMovie can export movies, but its overview does not specify TikTok-oriented portrait settings. Test a representative clip first and use instructions matched to your device and iMovie version if the exported orientation or framing is wrong. [citation-2]
Can I Add Text and Music in iMovie?
Yes. Apple documents text tools, built-in soundtrack music, sound effects, and audio-level adjustment. Keep text readable, balance music against speech, and check permissions for the media you include. [citation-2]
Can I Publish Directly to TikTok from iMovie?
Apple’s overview documents sharing on social media generally, not direct TikTok publishing. Treat export and TikTok posting as separate stages in this workflow, and review the finished file before publishing. [citation-2]