How to Do Velocity on CapCut with Speed Curves
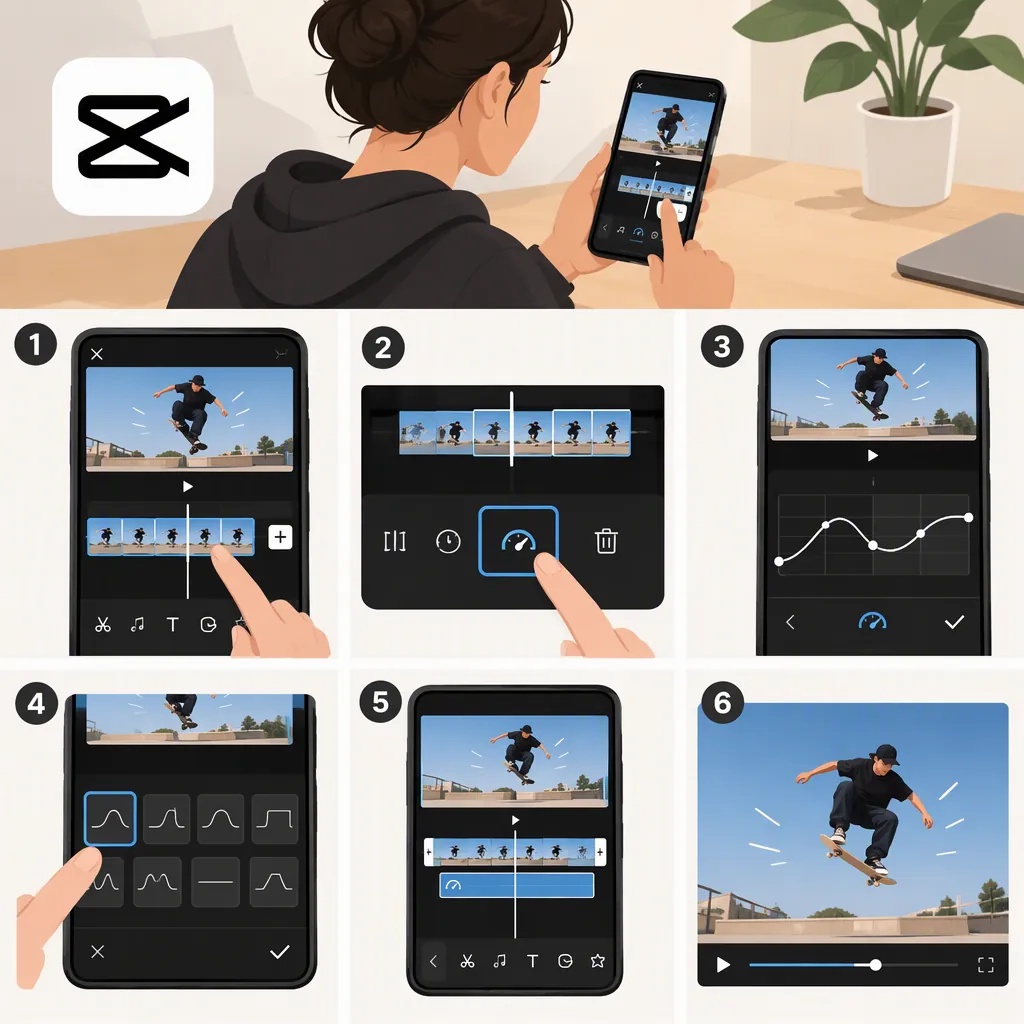
To make a velocity edit on CapCut, select your clip and open Speed > Curve, then choose Custom or Customized. Adjust points on the curve to alternate between faster and slower playback. On mobile, the supplied guide places this under Edit > Speed > Curve > Custom. These paths come from a guide dated June 17, 2025; labels and available options may differ in your version. [c2]
What Velocity Means in CapCut
A velocity edit changes playback speed at different points within a clip. Rather than keeping the entire shot at one speed, it can move from fast playback into slow motion and back again. CapCut’s supplied guide describes this as a way to emphasize action, vary pacing, or create rhythmic speed changes. [c2]
For a first edit, choose one moment to emphasize: a jump, turn, gesture, or other visible action. Plan a simple fast–slow–fast pattern around it before adding other effects. This is an editing suggestion, not a required CapCut preset.
Make a Velocity Edit on Mobile
The supplied CapCut guide describes this manual mobile workflow: [c2]
- Open New project, select your video, and add it to the timeline.
- Select the clip and open Edit > Speed > Curve > Custom.
- Adjust the curve at the points where you want the speed to change. Move points upward for faster playback and downward for slower playback.
- Preview the result and refine the speed changes. The guide also describes options to delete beats and apply smooth slow motion.
- Use the export/download icon at the top of the screen to save the result.
The same guide describes an automatic route through Edit > Style > Velocity, with presets that use music detection. It notes that some presets are paid. Treat this as an alternative if those controls appear in your app, not as a menu path guaranteed across versions. [c2]
Use Speed Curves on Desktop or in a Browser
For desktop, the supplied guide gives the following sequence: [c2]
- Create a New Project, import your footage, and place it on the timeline.
- Select the clip, open Speed in the right panel, and choose Curve.
- Select Customized to open the manual velocity controls.
- Adjust the curve’s horizontal position to change the timing of the speed effect and its vertical position to change playback speed.
- Preview your edit, then open Export and review the output settings before saving.
For the browser editor, the guide describes uploading a clip, selecting it on the timeline, and opening Speed > Curve > Custom in the right panel. Its export workflow uses Export > Download to save locally. The supplied material does not establish whether every described control is available in every current account or version. [c2]
Time Speed Changes to Music
CapCut’s guide recommends adding music and aligning velocity points with beats or rhythmic moments. [c2]
For a manageable first pass, pick one beat and one visual action rather than trying to match every beat. Place the slow section around the action you want viewers to notice, then preview it with the music. Adjust and preview again rather than judging timing only from the curve.
Use the following checklist as an editing exercise; it is not a CapCut preset or a promise of a particular result.
One-Beat Velocity Practice Checklist
- Choose one clip and one musical beat.
- Identify the visual action to emphasize.
- Create a faster lead-in, a slower emphasis section, and a return to faster playback.
- Preview with music and adjust the timing.
- Watch without music to check whether the action remains understandable.
- Export a short test and review it before finishing the full edit.
Review Choppy or Abrupt Results
If the edit feels abrupt, first try making the speed transitions more gradual. CapCut’s guide recommends adjusting smoothness and refining speed-control points; it also describes a Smooth slow mo option in the desktop velocity controls and smooth slow-motion support in the mobile workflow. [c2]
Change one setting at a time and compare previews. If available, test smooth slow motion rather than assuming it will improve every shot. Export a short sample and inspect the slowed section, the transition back to faster playback, and the music timing.
The supplied guide does not establish that any particular curve, frame rate, or smoothing option guarantees artifact-free results.
Choose Between Templates and Manual Curves
The supplied velocity-template page lists ready-made velocity edits and describes slow-motion and speed-ramp templates. The how-to guide separately explains manual curve editing. These are distinct starting points: choosing an existing template versus adjusting the speed changes yourself. [c1] [c2]
Use manual curves when your main goal is to practice timing a specific action. Consider a template when you want to start from an existing edit pattern, then inspect how your footage fits it. The supplied references do not verify current access, cost, or customization controls for each individual template.
FAQ
Where Is Velocity in CapCut?
For manual editing, the supplied guide lists Edit > Speed > Curve > Custom on mobile, Speed > Curve > Customized on desktop, and Speed > Curve > Custom in the browser editor. It also describes mobile presets under Edit > Style > Velocity. Menu labels may differ in your version. [c2]
Is Velocity the Same as Slow Motion?
Not exactly. Slow motion can be part of a velocity edit, but velocity editing varies speed at different points within the clip, including faster playback and transitions between speeds. [c2]
Do I Need a Template to Make a Velocity Edit?
No. The supplied guide describes manual speed curves on mobile, desktop, and in the browser editor. Templates are a separate option for starting with an existing velocity-edit pattern. [c1] [c2]