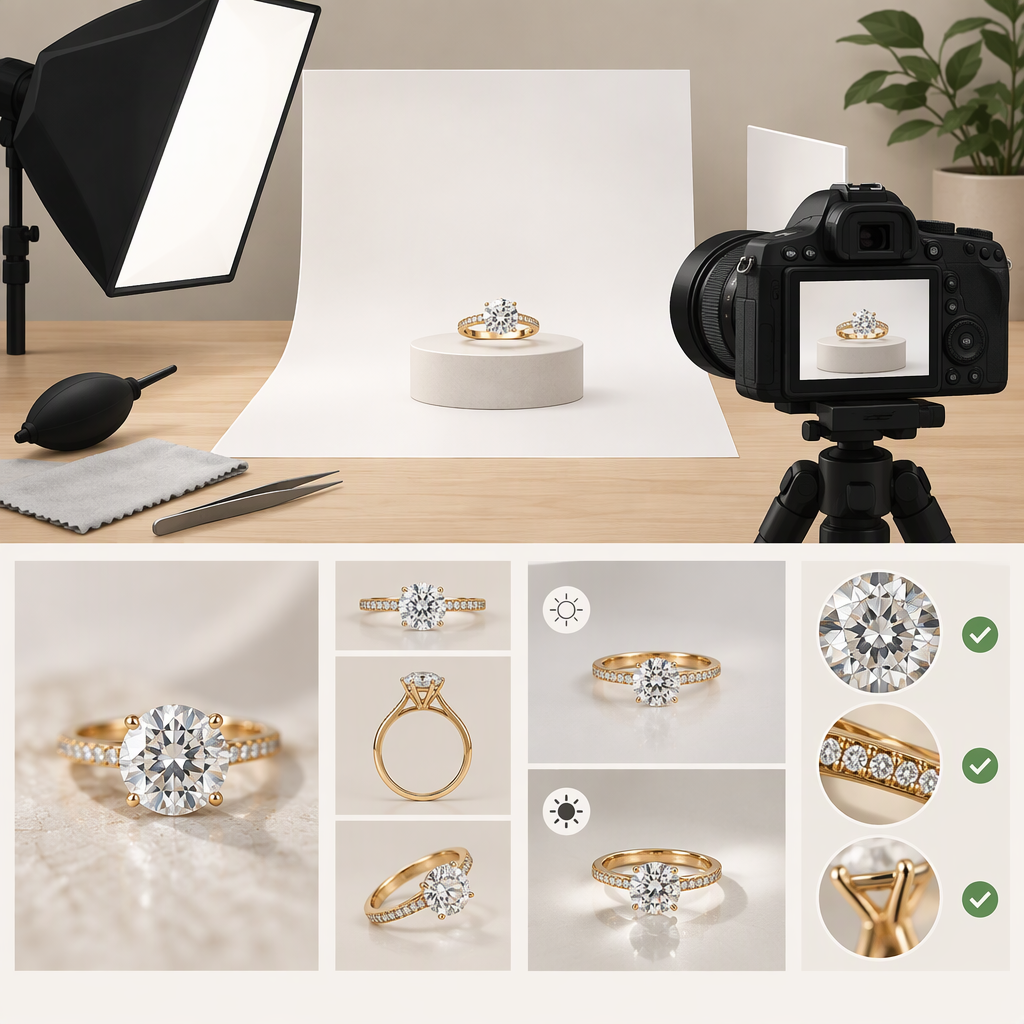
Ring Product Photography: A Practical Guide to Photographing Jewelry Rings
“Ring product photography” can mean photographing jewelry rings, or using a ring light to photograph products. The current search results sampled for the exact phrase lean toward jewelry-ring photography, so this guide focuses on making product images of rings—not a general guide to ring lights. That is a useful indication, not proof of what every searcher means. (pinterest.com)
A ring light is one possible light source, not a camera or a complete setup. If you meant using one to photograph other products, the lighting section below offers a starting point, but the main guide is about photographing rings.
Choose a Setup You Can Control
Start with the ring, the image you need, and the equipment you already have. You do not need to begin with a dedicated studio.
- Camera or phone: Use a phone if it can focus closely enough to show the detail you need. A camera with a close-focusing lens can give you more control over framing and focus. Adobe notes that a smartphone can be a useful product-photography option, while cameras with more settings offer additional control. The practical choice depends on whether your device can produce a clear image at the intended size. (adobe.com)
- Stability: Rest the phone on a firm support or use a tripod. Keeping the framing fixed makes it easier to adjust the ring and light, and helps avoid camera shake. A timer or remote shutter can help you take the picture without touching the camera.
- Light control: Begin near a window with indirect daylight, or use a lamp you can move. A white sheet of paper or other translucent material between the light and ring can soften the light; keep it safely away from hot lamps. If you need repeatable lighting, a small light tent is another option, but it is not required. Nikon’s jewelry-photography guide describes using a light tent to diffuse and contain light; its featured photographer also worked outdoors without flash. (nikonusa.com)
- Background and support: Choose a plain background for a straightforward product view, or a simple prop when it helps explain scale or style. A small piece of removable putty or another suitable support can hold a ring upright; check that it does not show in the frame or damage the item.
Before shooting, clean the ring and background, remove visible dust, and decide what the image should communicate. A single view might show the ring’s overall shape; a detail view can show a setting or texture. If the image is for a specific shop or publication, check its current requirements first. No destination is assumed here.
Shape the Light; Inspect the Reflection
Polished metal and stones reflect their surroundings, so a bright or dark shape in the ring may come from the room or lighting—not from the ring itself. Nikon identifies reflections, flare, and hot spots as particular challenges in jewelry photography. Its example setup uses a light tent to soften and control light. (nikonusa.com)
Try this simple, repeatable process:
- Put the ring in position and frame the shot.
- Take a picture, then zoom in on the ring on your screen.
- Notice where the brightest highlights and dark reflections fall.
- Change one thing: move the light, diffuse it, or use a white card to reflect light back into a dark area. Take another picture and compare.
For example, if a narrow, bright highlight distracts from the ring’s shape, try making the light source appear larger to the ring by moving a diffuser closer to the light path, or reposition the light. If one side looks too dark, try a white card on that side. These are tests, not guaranteed fixes: a polished surface reflects its surroundings, and the result depends on the ring and arrangement. Change one element at a time so you can tell what helped.
A ring light can be tested like any other light source. Check the ring itself for distracting reflections and uneven highlights rather than assuming the light’s shape will produce a particular look. If the image is not working, move or diffuse the light, or try a different source.
Capture a Clear, Purposeful View
Fix the camera position first, then focus on a meaningful part of the ring—often the setting or front edge. Take a frame and inspect it enlarged. If the chosen detail looks soft, refocus and take another image; also check that the ring or camera did not move.
Close-up photography makes focus especially demanding: Canon explains that at life-size magnification, very little beyond the plane of focus may appear sharp. (canon-europe.com) A camera user can try a smaller aperture to bring more of the ring into focus, but that may require more light or a longer exposure. There is no one setting that suits every camera, distance, and lighting arrangement. With a phone, try moving slightly farther away and cropping later if the camera will not focus at the distance you want.
Choose an angle that shows the feature relevant to the image. A front or three-quarter view can show the ring’s overall form; a separate close view can emphasize a setting or surface detail. Take more than one view when one frame cannot show both clearly. Keep the ring’s shape and proportions natural rather than relying on an extreme angle that makes it hard to understand.
Optional advanced step: If one close-up cannot keep enough of the ring sharp, focus stacking combines multiple images focused at different distances. It can extend apparent depth of field, but it adds capture and editing work and is not needed for every image. Nikon describes stacking as combining the in-focus areas of a series of shots. (nikonusa.com)
Troubleshoot by Changing One Thing at a Time
| What you see | A next test |
|---|---|
| Distracting bright or dark reflection | Move the light or ring, diffuse the source, or place a white card to alter what the ring reflects. Retake and compare. |
| Harsh highlight | Soften the light with a diffuser or move it; inspect the metal and stones again before changing other parts of the setup. |
| One side looks too dark | Add a white card on the darker side to reflect some light back, then compare. |
| Ring looks soft | Stabilize the camera and ring, refocus on the intended detail, and inspect an enlarged image. |
| Only a small part of the ring is sharp | Try a smaller aperture if using a camera, add light if needed, or make a less extreme close-up. For demanding detail work, consider whether focus stacking is worth the extra steps. |
| Ring is hard to read in the frame | Simplify the background, adjust the angle, or make a separate detail image. |
These are starting points, not diagnoses that can be made from the symptom alone. Review each new frame before moving on; several changes at once make it difficult to know which adjustment mattered.
Finish Without Changing What the Ring Is
Crop, straighten, and make modest exposure or color corrections when they help the image resemble the item under neutral viewing conditions. Compare the finished image with the ring in suitable light, and keep an unchanged original. Avoid edits that change the apparent metal or stone color, remove a feature or defect that matters to a buyer, or add detail that was not there. This is a representation principle, not a claim about any particular platform’s rules. If the image will be used for a listing, follow that destination’s current requirements as well.
Quick check before you finish: Is the intended part of the ring in focus? Are highlights and reflections distracting? Does the angle explain the ring? Does the finished image still represent its color, shape, and visible details? If not, return to the relevant setup adjustment and make another frame.